Link vs Refresh
-
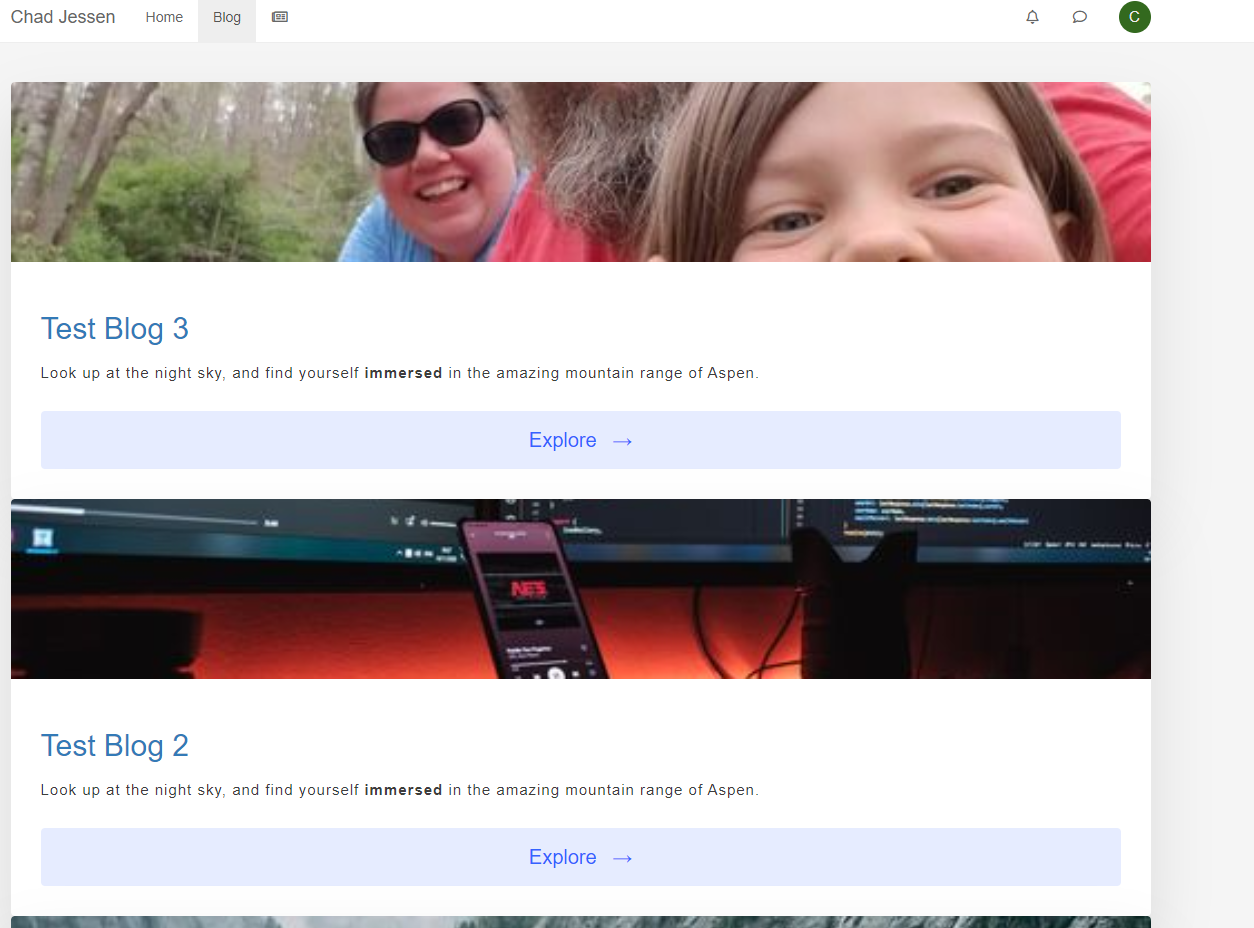
@phenomlab I get the following error when I go to that address. Also I sent you a DM with username and password so you can login and take a look.
Internal Error. Oops! Looks like something went wrong! /user/admin/blog Cannot read property 'username' of null@Madchatthew thanks. I’ll check on this tomorrow.
Mark Cutting also advises organisations as a Fractional CIO, Fractional CISO and Executive Advisor, helping boards improve technology governance, cyber resilience and executive decision making. Learn more at Gratmore Ltd
-
@Madchatthew thanks. I’ll check on this tomorrow.
-
@phenomlab Sounds good! Thank you!!
@Madchatthew From what I can see, you have some custom JS that looks like the below
const gridItem = document.getElementById("gridItem");
gridItem.removeAtribute('style');
I’m not entirely sure what this is for, but it will only fire on page load - not on
AJAXcalls which is used when clicking links. To fix this issue, you can wrap the JS so that it will also work onAJAXcalls as follows$(window).on('action:ajaxify.end', function(data) { const gridItem = document.getElementById("gridItem"); gridItem.removeAtribute('style'); });This will then allow the same code to execute when the links are clicked. However, this then generates the below error in the console
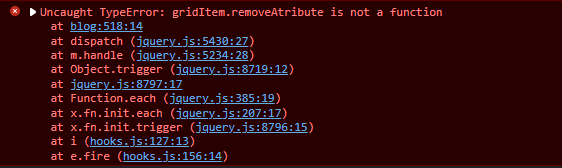
This relates to
gridItem.removeAttributenot being a valid function, so the JS fails and will not process further. This shortened version will work though$(window).on('action:ajaxify.end', function(data) { document.getElementById("gridItem").removeAttribute("style"); });As I mentioned, I do not see any reason for this specific code to execute, as it appears to be removing a style from an element. Is this actively being used for anything ? This doesn’t seem to be causing the strange layout - I suspect this comes from the URL entered in
config.jsonin the NodeBB root.The blog page should also show when you navigate to
https://siteurl.com/user/username/blogbut it fails to render with the below in the consoleGET http://x.x.x.x/assets/src/client/account/fte-blog.js?v=ph7njujnhro net::ERR_ABORTED 404 (Not Found)Again, I think this is because of the
urlvalue inconfig.json. Is there any way I can get access to the Ubuntu server this instance is running on ?Mark Cutting also advises organisations as a Fractional CIO, Fractional CISO and Executive Advisor, helping boards improve technology governance, cyber resilience and executive decision making. Learn more at Gratmore Ltd
-
@Madchatthew From what I can see, you have some custom JS that looks like the below
const gridItem = document.getElementById("gridItem");
gridItem.removeAtribute('style');
I’m not entirely sure what this is for, but it will only fire on page load - not on
AJAXcalls which is used when clicking links. To fix this issue, you can wrap the JS so that it will also work onAJAXcalls as follows$(window).on('action:ajaxify.end', function(data) { const gridItem = document.getElementById("gridItem"); gridItem.removeAtribute('style'); });This will then allow the same code to execute when the links are clicked. However, this then generates the below error in the console
This relates to
gridItem.removeAttributenot being a valid function, so the JS fails and will not process further. This shortened version will work though$(window).on('action:ajaxify.end', function(data) { document.getElementById("gridItem").removeAttribute("style"); });As I mentioned, I do not see any reason for this specific code to execute, as it appears to be removing a style from an element. Is this actively being used for anything ? This doesn’t seem to be causing the strange layout - I suspect this comes from the URL entered in
config.jsonin the NodeBB root.The blog page should also show when you navigate to
https://siteurl.com/user/username/blogbut it fails to render with the below in the consoleGET http://x.x.x.x/assets/src/client/account/fte-blog.js?v=ph7njujnhro net::ERR_ABORTED 404 (Not Found)Again, I think this is because of the
urlvalue inconfig.json. Is there any way I can get access to the Ubuntu server this instance is running on ?@phenomlab I added the js to remove a style that was making the layout not work the way I wanted. So I thought well I will just remove the style so that my css will work. When I did that then my layout would work. But maybe that is the cause of my issue?
I will see if I can set it up so you can access the server remotely. I will figure out how to make the IP public so you can remote in or at least so you can access the virtualmin/webmin pages.
-
@phenomlab I added the js to remove a style that was making the layout not work the way I wanted. So I thought well I will just remove the style so that my css will work. When I did that then my layout would work. But maybe that is the cause of my issue?
I will see if I can set it up so you can access the server remotely. I will figure out how to make the IP public so you can remote in or at least so you can access the virtualmin/webmin pages.
@Madchatthew great. Thanks
Mark Cutting also advises organisations as a Fractional CIO, Fractional CISO and Executive Advisor, helping boards improve technology governance, cyber resilience and executive decision making. Learn more at Gratmore Ltd
-
@Madchatthew great. Thanks
@phenomlab I sent you a DM with the info in it. Thanks again!
-
@phenomlab I sent you a DM with the info in it. Thanks again!
@Madchatthew I took an extended look at this, and the issue is being caused by the code you have for the custom template below
<div class="grid"> <!-- BEGIN topics --> <div id="gridItem" class="grid__item"> <div class="card"> <img class="card__img" src="{topics.imageurl}"> <div class="card__content"> <h1 class="card__header"><a href="{config.relative_path}/topic/{topics.slug}">{topics.title}</a></h1> <p>{topics.date.full}</p> <p class="card__text">{topics.post.content}</p> <a href="{config.relative_path}/topic/{topics.slug}"><button class="card__btn">Read More<span>→</span></button></a> </div> </div> </div> <!-- END topics --> </div>No matter what I try, it looks like the CSS you have is being overridden by either the plugin, or the core itself. Based on this, I took the decision to rewrite the code. Here’s what is in use now on your site
<div class="row blog-wrapper"> <br> <!-- BEGIN topics --> <div class="col-xs-2 col-sm-2 post-holder" tid="{topics.tid}"> <div class="blog-container"> <a href="{config.relative_path}/topic/{topics.slug}" class="post-box" style="min-height: 340px;"> <div class="parent"> <figure class="blog-image child" style="background: {topics.user.icon:bgColor} <!-- IF topics.imageurl --> url({topics.imageurl}) <!-- END topics.imageurl --> ;"> </figure> </div> <div class="blog"> <span class="category">{topics.title}</span> </div> </a> </div> </div> <!-- END topics --> </div> <!-- IF paginator --> <div class="section sectionMain"> <div class="PageNav"> <nav> <!-- IF prevpage --> <a href="{config.relative_path}{featuredRoute}{prevpage}" class="btn btn-default paginate"></a> <!-- ENDIF prevpage --> <!-- BEGIN pages --> <a href="{config.relative_path}{featuredRoute}{pages.number}" class="btn <!-- IF pages.currentPage -->btn-primary active<!-- ELSE -->btn-default<!-- ENDIF pages.currentPage -->">{pages.number}</a> <!-- END pages --> <!-- IF nextpage --> <a href="{config.relative_path}{featuredRoute}{nextpage}" class="btn btn-default paginate"></a> <!-- ENDIF nextpage --> </nav> </div> </div> <!-- ENDIF paginator --> </div>Plus, I added some custom CSS on your site
/* Phenomlab Custom CSS */
figure.blog-image {
    border-top-left-radius: 4px;
    border-top-right-radius: 4px;
    background-size: cover !important;
    height: 150px;
}
.blog {
    background: #ffffff;
    border-radius: 0 0 4px 4px;
    border-top: 0;
    color: #333;
    font-size: 2.0em;
    padding: 20px 25px;
    line-height: 1.5em;
    min-height: 108px;
    transition: all .2s ease-in-out;
    margin: 1px;
}
.post-holder {
    margin-bottom: 20px;
}
.row.blog-wrapper {
    padding: 50px;
}
span.category {
    color: #3384C7;
}
.blog-content-wrapper {
  max-width: 400px;
  margin: 50px auto;
}
@media (max-width: 767px) {
.post-holder {
    width: 100%;
}
}
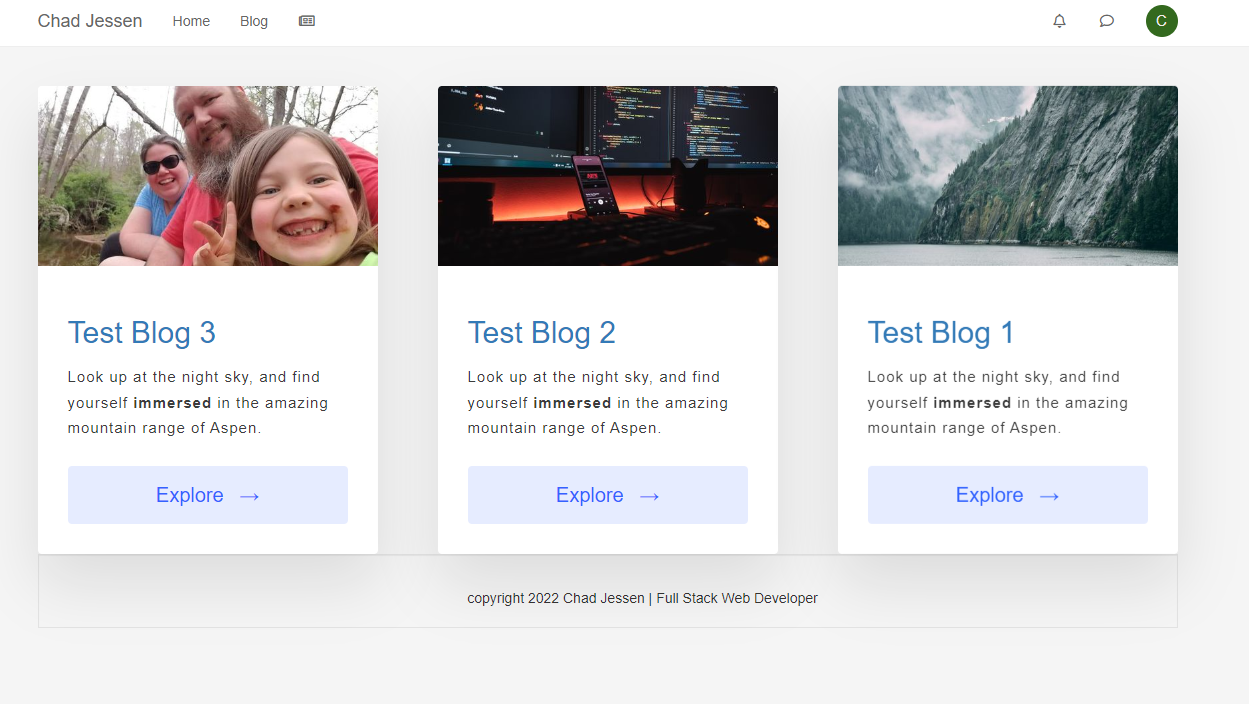
The end result is this when accessing the site directly, or clicking the “Blog” link

As you can see, this works without issue. Of course, you’ll need to tweak the template I created (and probably the CSS) to get the desired look and feel you want. Note, that an
<a>tag is present in the entire body of each post, so no matter where you click, it’ll open the associated article - there’s no need for a “Read More” or “Explore” function.The code is also 100% mobile friendly, and will stack accordingly at
767pxin terms of viewport breakpoint.Mark Cutting also advises organisations as a Fractional CIO, Fractional CISO and Executive Advisor, helping boards improve technology governance, cyber resilience and executive decision making. Learn more at Gratmore Ltd
-
@Madchatthew I took an extended look at this, and the issue is being caused by the code you have for the custom template below
<div class="grid"> <!-- BEGIN topics --> <div id="gridItem" class="grid__item"> <div class="card"> <img class="card__img" src="{topics.imageurl}"> <div class="card__content"> <h1 class="card__header"><a href="{config.relative_path}/topic/{topics.slug}">{topics.title}</a></h1> <p>{topics.date.full}</p> <p class="card__text">{topics.post.content}</p> <a href="{config.relative_path}/topic/{topics.slug}"><button class="card__btn">Read More<span>→</span></button></a> </div> </div> </div> <!-- END topics --> </div>No matter what I try, it looks like the CSS you have is being overridden by either the plugin, or the core itself. Based on this, I took the decision to rewrite the code. Here’s what is in use now on your site
<div class="row blog-wrapper"> <br> <!-- BEGIN topics --> <div class="col-xs-2 col-sm-2 post-holder" tid="{topics.tid}"> <div class="blog-container"> <a href="{config.relative_path}/topic/{topics.slug}" class="post-box" style="min-height: 340px;"> <div class="parent"> <figure class="blog-image child" style="background: {topics.user.icon:bgColor} <!-- IF topics.imageurl --> url({topics.imageurl}) <!-- END topics.imageurl --> ;"> </figure> </div> <div class="blog"> <span class="category">{topics.title}</span> </div> </a> </div> </div> <!-- END topics --> </div> <!-- IF paginator --> <div class="section sectionMain"> <div class="PageNav"> <nav> <!-- IF prevpage --> <a href="{config.relative_path}{featuredRoute}{prevpage}" class="btn btn-default paginate"></a> <!-- ENDIF prevpage --> <!-- BEGIN pages --> <a href="{config.relative_path}{featuredRoute}{pages.number}" class="btn <!-- IF pages.currentPage -->btn-primary active<!-- ELSE -->btn-default<!-- ENDIF pages.currentPage -->">{pages.number}</a> <!-- END pages --> <!-- IF nextpage --> <a href="{config.relative_path}{featuredRoute}{nextpage}" class="btn btn-default paginate"></a> <!-- ENDIF nextpage --> </nav> </div> </div> <!-- ENDIF paginator --> </div>Plus, I added some custom CSS on your site
/* Phenomlab Custom CSS */
figure.blog-image {
    border-top-left-radius: 4px;
    border-top-right-radius: 4px;
    background-size: cover !important;
    height: 150px;
}
.blog {
    background: #ffffff;
    border-radius: 0 0 4px 4px;
    border-top: 0;
    color: #333;
    font-size: 2.0em;
    padding: 20px 25px;
    line-height: 1.5em;
    min-height: 108px;
    transition: all .2s ease-in-out;
    margin: 1px;
}
.post-holder {
    margin-bottom: 20px;
}
.row.blog-wrapper {
    padding: 50px;
}
span.category {
    color: #3384C7;
}
.blog-content-wrapper {
  max-width: 400px;
  margin: 50px auto;
}
@media (max-width: 767px) {
.post-holder {
    width: 100%;
}
}
The end result is this when accessing the site directly, or clicking the “Blog” link
As you can see, this works without issue. Of course, you’ll need to tweak the template I created (and probably the CSS) to get the desired look and feel you want. Note, that an
<a>tag is present in the entire body of each post, so no matter where you click, it’ll open the associated article - there’s no need for a “Read More” or “Explore” function.The code is also 100% mobile friendly, and will stack accordingly at
767pxin terms of viewport breakpoint.@phenomlab Wow, that is awesome! I can see I have a long way to go before I become a web dev. It seems to me like I should have been able to figure this out. Thanks again for your help. I really appreciate it!!
-
@phenomlab Wow, that is awesome! I can see I have a long way to go before I become a web dev. It seems to me like I should have been able to figure this out. Thanks again for your help. I really appreciate it!!
@Madchatthew No problem at all. More than happy to help with stuff like this

-
 undefined phenomlab has marked this topic as solved on
-
@pobojmoks Do you see any errors being reported in the console ? At first guess (without seeing the actual code or the site itself), I’d say that this is AJAX callback related

Hello! It looks like you're interested in this conversation, but you don't have an account yet.
Getting fed up of having to scroll through the same posts each visit? When you register for an account, you'll always come back to exactly where you were before, and choose to be notified of new replies (either via email, or push notification). You'll also be able to save bookmarks and upvote posts to show your appreciation to other community members.
With your input, this post could be even better 💗
Register LoginDid this solution help you?
Related Topics
-
-
-
Link Not Working
Solved Customisation -
-
-
-
-