Wasting time on a system that hangs on boot

Blog
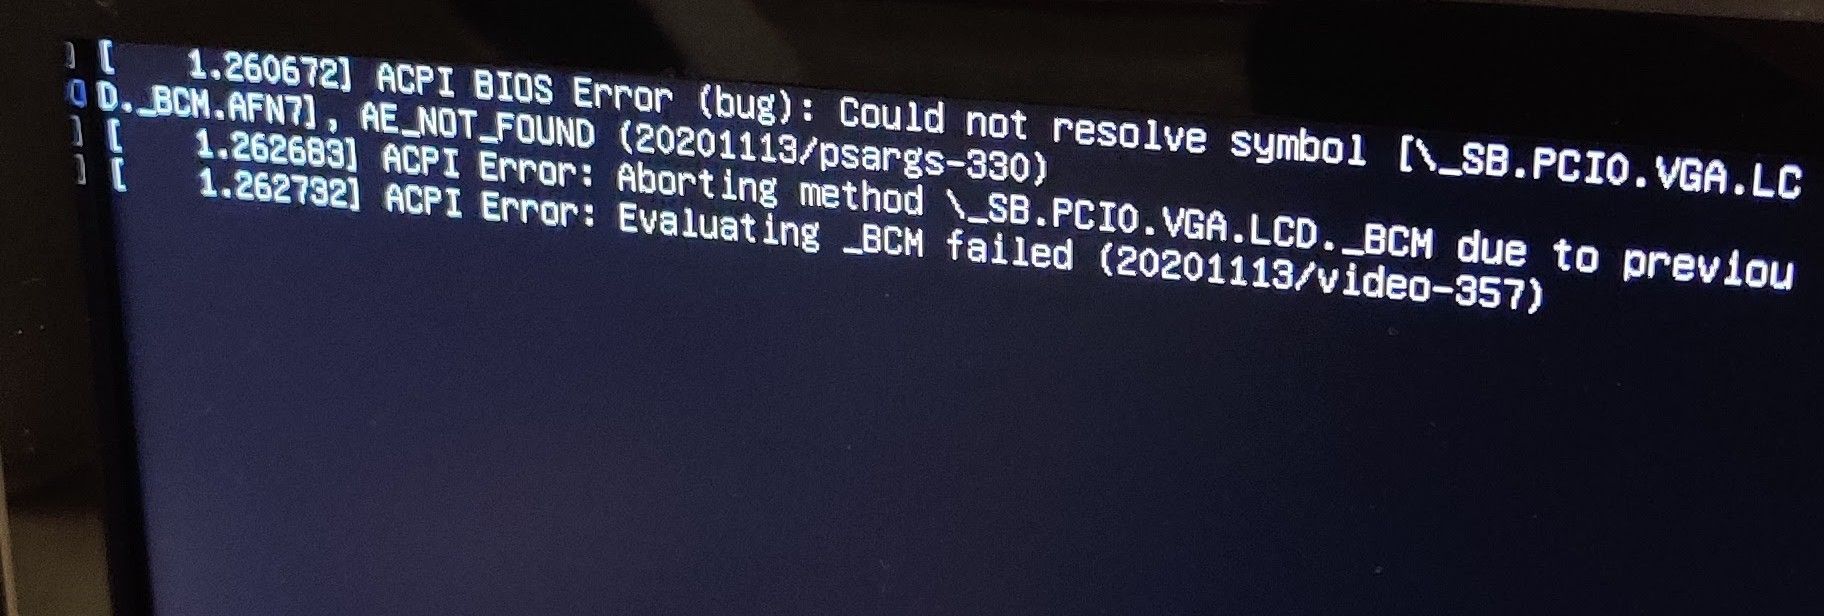
  • For a while now, my dual boot system (Windows, which I use for work, and KDE Neon which I use primarily) had been exhibiting issues in the sense that when I elected to start Neon, the system would hang during boot for 3-4 minutes and only display the below before finally showing the SDDM login

    IMG_20211018_190033~2.jpg

    Then, when you did actually get to login, the system would then hang for another two minutes before the desktop was displayed. And to add insult to injury, you couldn’t interact with the system for another 45 seconds !

    Frustrating - VERY frustrating 🤬

    As I’d recently made the system dual boot for work and home usage, I thought that the bios could be at fault here, so after some research, I went ahead and upgraded that. Unsurprisingly, the bios was pretty out of date. I’m no fan of bleeding edge when it comes to motherboard firmware, and will only upgrade if there is a genuine requirement. Besides, it’s pretty easy to brick a system by flashing with an incorrect bios which will leave you with a machine that won’t start at all.

    The bios upgrade went well, but certainly contributed nothing to resolving the issue at hand. Windows booted perfectly with no issues at all, but KDE ? No dice. Same issue. After googling the message displayed just before SDDM started, there were literally hundreds of posts ranging from bios to display driver updates.

    Undeterred (well, perhaps a bit disheartened) I started trawling though multiple posts trying to perhaps identify the Holy Grail. After a couple of hours of fruitless searching, I gave up. After all, KDE would actually boot, but not without significant delay. I could live with that (well, not really, but I’m the absence of a fix, I was going to have to put up with it).

    Later in the week, I decided to clean the desk in my office meaning I needed to unplug everything so I could clear the area. After cleaning, I reconnected everything and powered the system back on. KDE was set as the default in the bootloader, so was the first choice - and it booted cleanly without errors and within the usual 5 seconds!

    Ok. WTF. Somewhat perplexed at why this issue had suddenly “cured itself”, I decided to have a look at the connections. For a long time, I’ve had a USB cable from the back of the PC into my monitor so I can extend the USB ports I have and at the same time, make them more accessible (rather then having to climb on the desk just to connect a new device).

    I realized that this was one lead I hadn’t connected. Curious, I shutdown the PC and then reconnected the cable. On boot, sure enough, a long delay and KDE started. I shutdown again and removed this cable. On power on, no issues and KDE boots in 5 seconds!

    So after all that, it turns out it’s just a bloody lead 🤬🤬 and I’ve spent ages looking for a “fix” when there actually isn’t one from the software perspective. I replaced the cable, and we’re all good. I really have no idea why Windows doesn’t complain though - and I certainly don’t have the energy to spend hours researching that!

  • @phenomlab That sounds really annoying.
    But whatever was wrong with the lead, the OS should not respond like that.
    So faulty USB device or not, you could argue it is an OS bug in a way.
    Why do you prefer to use KDE Linux distro, over say Ubuntu?

  • @Panda said in Wasting time on a system that hangs on boot:

    Why do you prefer to use KDE Linux distro, over say Ubuntu?

    A matter of taste really. I’ve tried pretty much every Linux distro out there over the years, and whilst I started with Ubuntu, I used Linux mint for a long time also. All of them are Debian backed anyway 😁

    I guess I feel in love with KDE (Neon) because of the amount of effort they’d gone to in relation to the UI.

    I agree about the lead and the OS statement which is why I suspect that Windows simply ignored it (although the Device also worked fine there, so it clearly wasn’t that faulty)


  • 0 Votes
    1 Posts
    83 Views

    Lower grade VPS instances, whilst cheap, do have the inherent issue in the fact that they only have 1Gb of RAM. In most cases, this is enough for relatively small or minor projects, but when you need more RAM that you actually have, you’ll quickly find that instance exhausted, and your applications crashing as a result.

    This is where the swap file comes into play. Adding a swap can significantly improve performance on low budget hosts, but without direct root access, this is not going to be possible. If you own a VPS that has root level access and need to add a swap, follow the below guide.

    First, what exactly is a Swap?

    swap is a section of hard disk space that has been set reserved for the operating system to temporarily store data that it is unable to hold in RAM. This step allows you increase the amount of information that your server can keep in its working memory (but not without with some caveats, which I’ll explain below). The swap space on the hard disk will be used mostly when there is no more sufficient space in RAM to host any in-use application data.

    The information written to disk will be far slower than information kept in RAM (RAM is superior in terms of speed owing to its architecture), but the operating system will prefer to keep running application data in memory and only use the swap for the older data. Essentially, having swap space as a failsafe for when your system’s physical memory is depleted can be a good safety net against crashes on systems with non-SSD storage available.

    Determine the size of the Swap we actually need.

    This process is made so much easier by using the below calculator

    https://pickwicksoft.github.io/swapcalc/

    Admittedly, if you only had 1Gb RAM, the SWAP would be default at 1Gb. You can play with the various configurations here to get the results you need, but be honest - don’t make your system out to be something it isn’t, because otherwise, you’ll create more problems than you set out to resolve.

    Swap space refers to a designated portion of hard drive storage that’s reserved for temporary data storage by the operating system when the RAM can’t accommodate it any longer. This allows for an expansion of the data that your server can hold in its active memory, though with certain conditions. The swap area on the hard drive comes into play primarily when there isn’t enough room left in the RAM to hold active application data.

    The data that gets written to the disk is notably slower than the data stored in RAM. Nevertheless, the operating system prioritizes keeping currently used application data in memory and employs swap for older data. Having swap space as a fallback when your system’s RAM is exhausted can serve as a valuable safeguard against out-of-memory errors, especially on systems with traditional non-SSD storage.

    Verifying the System for Swap Information

    Before proceeding, it’s advisable to confirm whether your system already has existing swap space. While it’s possible to have multiple swap files or swap partitions, typically one should suffice.

    You can check if your system has any configured swap by executing:

    sudo swapon --show

    If you receive no output, it means your system presently lacks swap space.

    You can also confirm the absence of active swap using the free utility:

    free -h

    As evident in the output, there is no active swap on the system, as shown in the Swap row.

    total used free shared buff/cache available Mem: 981Mi 122Mi 647Mi 0.0Ki 211Mi 714Mi SWAP: 0B 0B 0B Assessing Available Space on the Hard Drive Partition

    Before creating a swap file, it’s essential to check the current disk usage to ensure you have enough available space. This can be done by entering

    df -h Filesystem Size Used Avail Use% Mounted on tmpfs 1.6G 876K 1.6G 1% /run /dev/sda1 150G 65G 80G 45% / tmpfs 7.7G 0 7.7G 0% /dev/shm tmpfs 5.0M 0 5.0M 0% /run/lock /dev/sda15 253M 6.1M 246M 3% /boot/efi tmpfs 1.6G 0 1.6G 0% /run/user/1009

    The device with / in the Mounted on column is our disk in this case. We have sufficient remaining space available - 65G used. Your availability will obviously be different.

    The appropriate size of a swap space can vary according to personal preferences and application requirements. Typically, an amount equivalent to or double the system’s RAM is a good starting point. For a simple RAM fallback, anything over 4G of swap is usually deemed unnecessary.

    Creating a Swap File

    Now that you’ve determined the available hard drive space, you can generate a swap file on your file system. A file of your desired size, named ‘swapfile,’ will be allocated in your root directory (/).

    The recommended method for creating a swap file is by using the fallocate program, which instantly generates a file of the specified size. For instance, if your server has 1G of RAM, you can create a 1G file as follows:

    sudo fallocate -l 1G /swapfile

    You can confirm the correct space allocation by running:

    ls -lh /swapfile

    The file will be created with the appropriate space allocation.

    Activating the Swap File

    Now that you have a correctly sized file, it’s time to turn it into swap space. Initially, you must restrict file access to only root users, enhancing security. To achieve this, execute:

    sudo chmod 600 /swapfile

    You can verify the permission change with:

    ls -lh /swapfile

    As seen in the output, only the root user has read and write permissions.

    Next, mark the file as swap space with:

    sudo mkswap /swapfile

    Afterward, enable the swap file to allow your system to utilize it:

    sudo swapon /swapfile

    You can verify the availability of swap by executing:

    sudo swapon --show

    Finally, recheck the output of the free utility to confirm the setup:

    free -h Making the Swap File Permanent

    The changes made enable the swap file for the current session, but they won’t persist through a system reboot. To ensure your swap settings remain, you can add the swap file information to your /etc/fstab file. Here’s how you can do it:

    Back up the /etc/fstab file as a precaution:

    sudo cp /etc/fstab /etc/fstab.bak

    Add the swap file information to the end of your /etc/fstab file with:

    echo '/swapfile none swap sw 0 0' | sudo tee -a /etc/fstab Adjusting Swap Settings

    There are several settings you can configure to influence your system’s performance with swap. Two key settings are the swappiness property and the cache pressure setting:

    Swappiness Property: This parameter determines how often data is swapped from RAM to the swap space. A value between 0 and 100 represents a percentage. Lower values (close to 0) mean less frequent swapping, while higher values (closer to 100) encourage more swapping. You can check the current swappiness value with:

    cat /proc/sys/vm/swappiness

    You can set a different value using the sysctl command. For example, to set the swappiness to 10:

    sudo sysctl vm.swappiness=10

    This setting persists until the next reboot, but you can make it permanent by adding it to your /etc/sysctl.conf file.

    Cache Pressure Setting: This setting affects how the system caches inode and dentry information over other data. Lower values, like 50, make the system cache this information more conservatively. You can check the current cache pressure value with:

    cat /proc/sys/vm/vfs_cache_pressure

    To set a different value, use the sysctl command and update your /etc/sysctl.conf file as you did with the swappiness setting.

  • 2 Votes
    3 Posts
    56 Views

    @DownPW odd indeed. Looks like it’s spawning, immediately dying, then spawning again.

  • 1 Votes
    1 Posts
    78 Views

    During an unrelated discussion today, I was asked why I preferred Linux over Windows. The most obvious responses are that Linux does not have any licensing costs (perhaps not the case entirely with RHEL) and is capable of running on hardware much older than Windows10 will readily accept (or run on without acting like a snail). The other seeking point for Linux is that it’s the backbone of most web servers these days running either Apache or NGINX.

    The remainder of the discussion centered around the points below;

    Linux is pretty secure out of the box (based on the fact that most distros update as part of the install process), whilst Windows, well, isn’t. Admittedly, there’s an argument for both sides of the fence here - the most common being that Windows is more of a target because of its popularity and market presence - in other words, malware, ransomware, and “whatever-other-nasty-ware” (you fill in the blanks) are typically designed for the Windows platform in order to increase the success and hit rate of any potential campaign to it’s full potential.

    Windows is also a monolithic kernel, meaning it’s installed in it’s entirety regardless of the hardware it sits on. What makes Linux unique is that each module is compiled based on the hardware in the system, so no “bloat” - you are also free to modify the system directly if you don’t like the layout or material design that the developer provided.

    Linux is far superior in the security space. Windows only acquired “run as” in Windows XP, and a “reasonable” UAC environment (the reference to “reasonable” is loose, as it relates to Windows Vista). However, Microsoft were very slow to the gate with this - it’s something that Unix has had for years.

    Possibly the most glaring security hole in Windows systems (in terms of NTFS) is that it can be easily read by the EXT file system in Linux (but not the other way round). And let’s not forget the fact that it’s a simple exercise to break the SAM database on a Windows install with Linux, and reset the local admin account.

    Linux enjoys an open source community where issues reported are often picked up extremely quickly by developers all over the world, resolved, and an update issued to multiple repositories to remediate the issue.

    Windows cannot be run from a DVD or thumb drive. Want to use it ? You’ll have to install it

    Linux isn’t perfect by any stretch of the imagination, but I for one absolutely refuse to buy into the Microsoft ecosystem on a personal level - particularly using an operating system that by default doesn’t respect privacy. And no prizes for guessing what my take on Apple is - it’s essentially BSD in an expensive suit.

    However, since COVID, I am in fact using Windows 11 at home, but that’s only for the integration. If I had the choice, I would be using Linux. There are a number of applications which I’d consider core that just do not work properly under Linux, and that’s the only real reason as to why I made the decision (somewhat resentfully) to move back to Windows on the home front.

    Here’s a thought to leave you with. How many penetration testers do you know that use Windows for vulnerability assessments ?

    This isn’t meant to be an “operating system war”. It’s a debate

  • Is plesk good over virtual min?

    Solved Linux
    6
    4 Votes
    6 Posts
    267 Views
  • Environment Variables

    Solved Linux
    8
    1 Votes
    8 Posts
    257 Views

    @madchatthew great you got this to work ! Thanks for the update.

  • 0 Votes
    5 Posts
    642 Views

    @Ash3T I’m going to mark this post as solved as I’ve not heard from you in a while. Let me know if this isn’t the case and you need more help.

  • 18 Votes
    36 Posts
    734 Views

    you are too fast 😉

  • 2 Votes
    28 Posts
    1k Views

    @phenomlab said in Advantages and disadvantages of changing to Ubuntu?:

    @jac Yeah, I wouldn’t just leap into it unless you have a valid reason (such as the laptop no longer working and needing to be reinstalled). Probably better the devil you know currently.

    Absolutely mate, and generally as discussed that is the only time I have changed over to Ubuntu once the laptop has got slower.

    For now I will carry on with Windows, purchase the VPN & BitDefender in later October / early November and then see how all that runs for a few more months 👍🏻.