Iframely (Nodebb)
-
what I don’t understand is how Iframely can interact with NodeBB. There is nothing to configure on the NodeBB side?
@DownPW said in Iframely (Nodebb):
what I don’t understand is how Iframely can interact with NodeBB. There is nothing to configure on the NodeBB side?
We are using self-hosted iframely… Unfortunately, our developer is currently busy with relocation etc, therefore I cannot ask for more detail…
But we have this as the endpoint address:
http://0.0.0.0:8061/iframely?So, I guess we installed it as a subfolder at this port location in the same server? Maybe @phenomlab can tell it better
 sorry, I am not good at backend work
 -
@DownPW said in Iframely (Nodebb):
what I don’t understand is how Iframely can interact with NodeBB. There is nothing to configure on the NodeBB side?
We are using self-hosted iframely… Unfortunately, our developer is currently busy with relocation etc, therefore I cannot ask for more detail…
But we have this as the endpoint address:
http://0.0.0.0:8061/iframely?So, I guess we installed it as a subfolder at this port location in the same server? Maybe @phenomlab can tell it better
sorry, I am not good at backend work @crazycells typically, you do not need the port as that is handled and processed by the NGINX config. I have my instance running in a subdomain for security reasons with CORS headers adjusted to suit.
-
I have install Iframely nodebb plugin and setup with my local IP (because it’s a VM on no prod server) like this :
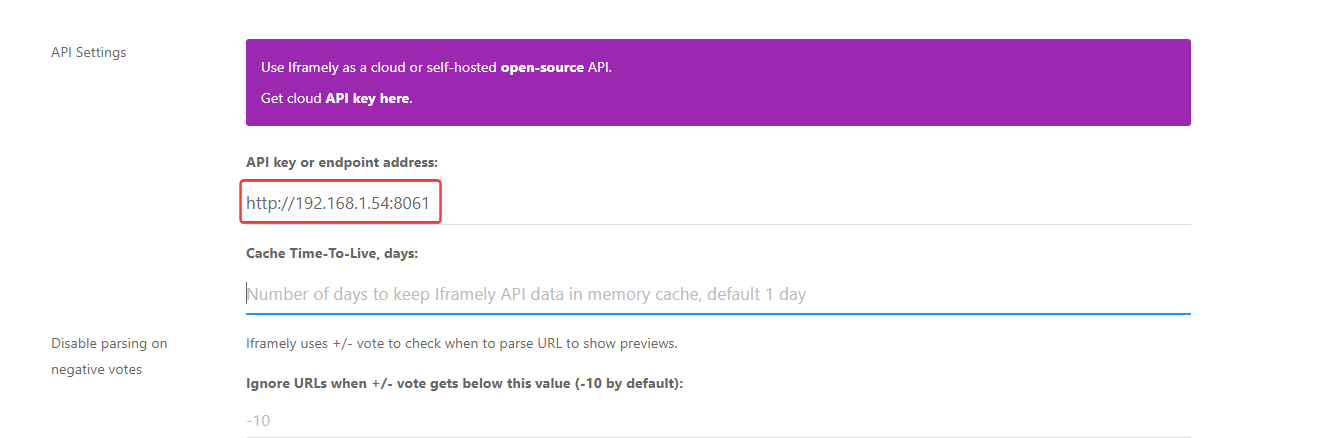
Doesn’t work
@DownPW from what I see, iFramely isn’t setup properly on your server as the port of
8061does not appear to be listening. For example, see below for the response I get when trying to access the port.
Another possibility here (and a strong one in fact) is that you probably need to open this port on your firewall (perhaps
iptables) and probably your router also (in terms of NAT).Mark – Founder, Phenomlab Ltd
Executive IT & Security Leadership
Phenomlab Ltd -
@DownPW from what I see, iFramely isn’t setup properly on your server as the port of
8061does not appear to be listening. For example, see below for the response I get when trying to access the port.Another possibility here (and a strong one in fact) is that you probably need to open this port on your firewall (perhaps
iptables) and probably your router also (in terms of NAT).PW and WS Spirit alive
-
@DownPW right, but what about
iptableson the server itself? The port isn’t responding which is the first hurdle to overcome. -
I don’t know because I think you are connected to ssh, so I don’t see this
grrr it’s a debian scratch and iptables is not installed by defaut
PW and WS Spirit alive
-
I don’t know because I think you are connected to ssh, so I don’t see this
grrr it’s a debian scratch and iptables is not installed by defaut
@DownPW what happens if you perform the same telnet command from the server itself ? If that responds, then the issue is possibly the NAT translation via the router.
Fire example, if
telnet 127.0.0.1 8061connects, then the port is listening on localhost. If you try the same but with the public IP you have instead, then that’s a NAT issue (potentially) -
very odd @phenomlab
I can connect to telnet on server (local host) and externally (with my phone on 4g network = externally network) with public ip
telnet privateIP 8061is OK on the server
telnet externalPublicIP 8061is OK with my smartphone on 5G (externally network) with Termux app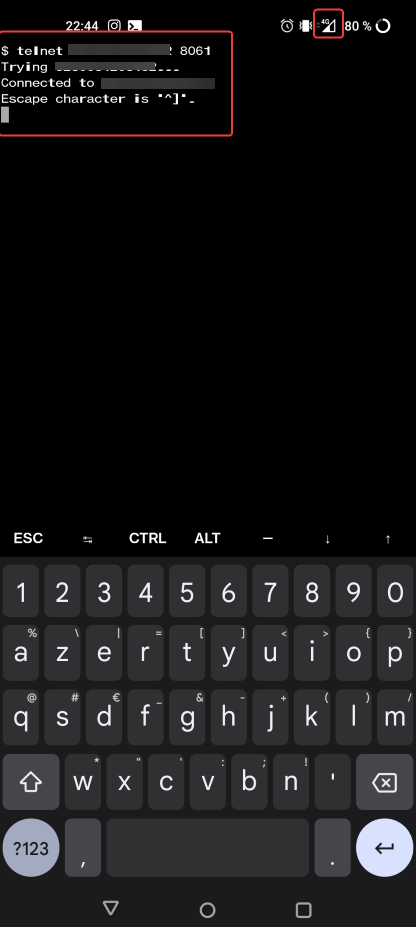
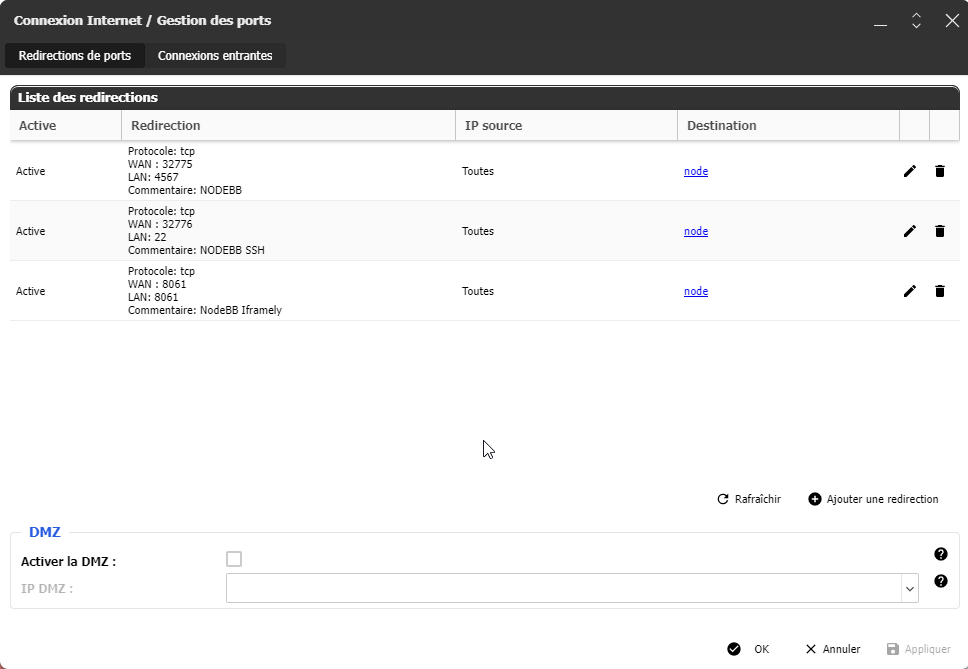
The NAT on my router and the server is OK on 8061 port
PW and WS Spirit alive
-
very odd @phenomlab
I can connect to telnet on server (local host) and externally (with my phone on 4g network = externally network) with public ip
telnet privateIP 8061is OK on the server
telnet externalPublicIP 8061is OK with my smartphone on 5G (externally network) with Termux appThe NAT on my router and the server is OK on 8061 port
@DownPW very odd. Ok. I’ll take a look at this tomorrow morning but I do need root access (and password) to this server.
Mark – Founder, Phenomlab Ltd
Executive IT & Security Leadership
Phenomlab Ltd -
@DownPW very odd. Ok. I’ll take a look at this tomorrow morning but I do need root access (and password) to this server.
@phenomlab said in Iframely (Nodebb):
@DownPW very odd. Ok. I’ll take a look at this tomorrow morning but I do need root access (and password) to this server.
OK
you already have these information in your PM")
PW and WS Spirit alive
-
@phenomlab said in Iframely (Nodebb):
@DownPW very odd. Ok. I’ll take a look at this tomorrow morning but I do need root access (and password) to this server.
OK
you already have these information in your PM@DownPW confirmed. Thanks
-
@phenomlab said in Iframely (Nodebb):
@DownPW very odd. Ok. I’ll take a look at this tomorrow morning but I do need root access (and password) to this server.
OK
you already have these information in your PM@DownPW This is now resolved. The issue was an incorrect URL specified in the Nodebb plugin. I’ve corrected this, and now it works as intended.
Hello! It looks like you're interested in this conversation, but you don't have an account yet.
Getting fed up of having to scroll through the same posts each visit? When you register for an account, you'll always come back to exactly where you were before, and choose to be notified of new replies (either via email, or push notification). You'll also be able to save bookmarks and upvote posts to show your appreciation to other community members.
With your input, this post could be even better 💗
Register LoginDid this solution help you?
Related Topics
-
-
-
NodeBB: Consent page
Solved Configure -
-
Gettin Erors NodeBB
Solved Configure -
-
iFramely self host help
Solved Configure -
NodeBB metadata
Solved Configure