Hardening WordPress - Reducing the attack vector
-
In order to effectively reduce costs, several businesses are moving away from complex designs and bespoke hosting to a simpler platform based on WordPress - often self-hosted. According to WordPress, “Code Is Poetry”, and literally anyone with a basic knowledge can create a website within a short space of time. With a potentially massive reduction in cost, who can blame anyone wanting to leverage such an opportunity ? Code may well be poetry, but without the requisite steps needed to harden the WordPress platform against external attacks, that same code can be exploited to gain access to your site – and where’s the poetic justice in that ? As an experienced WordPress developer, there are a number of attacks I would personally attempt on a WordPress site, and in this article, I will walk you through the most common (and some not so common) issues and explain why they are classed as vulnerabilities. I will also show you how to reduce the risk that each one poses with real world examples.
A quick thought. Would “poetry” still sound nice if you used it as an acronym ?
- Potentially
- Open To
- Exploit
- Theft
- Ransom
- Yikes (when you realise what’s happened)
Some time ago, I was reviewing security on a WordPress site that belongs to a local distribution company. I didn’t expect the result to be perfect, but it was certainly well below the bar in terms of what is considered acceptable and secure. A perfect level of security is unobtainable in my view – the threat landscape changes on a daily (sometimes hourly) basis, and so keeping up with each new trend really isn’t feasible unless you are a security analyst dedicated to this particular function. Businesses and individuals alike have evolved, and are looking at ways to do more with less – more about that a little further down the line.
What I did see startled me. The design of the website looks great to the normal user, but even the basic hardening steps have not been applied on this site. Having nearly choked on my coffee, I decided that awareness around this particular issue needed to be raised to help other people avoid similar pitfalls. Now, if you’ve gone down the WordPress.com route for your blog, this article isn’t for you. It really only applies to those who have chosen to run a self hosted site. Let’s get started
WordPress Hardening – a walk-through
OK. You’ve concluded you will use WordPress as your chosen CMS and blogging platform. WordPress is undoubtedly the most popular blogging platform in the world with an astonishing number of websites being solely based on it. For those who are blissfully unaware of the dangers that an unsecured WordPress platform can present, this information is for you.
Out of the box, WordPress is essentially ready to go from the blogging perspective. However, it’s a misconception that the same applies to security. As great a platform as WordPress is, mainly attributed to its vast array of plugins that extend the core functionality above and beyond, installing it then leaving the product in it’s vanilla state is a disaster waiting to happen. Even in it’s plainest form, there are a number of settings and best practice steps that should be taken in order to further harden the platform against attack.
IMPORTANT: Before you proceed any further, ensure you have a full backup (both files and database) of your WordPress installation !
Step 1 - Rename the admin account
WordPress uses an account to perform functions that require administrative access to the core and associated plugins. On all new self hosted installations, the account is named “admin” (unless you make use of an installer provided by the ISP, in which case, they will probably change this as part of the installation process). Any attacker with even a basic knowledge will target this account, and attempt to use either a dictionary attack, or brute force to gain access.
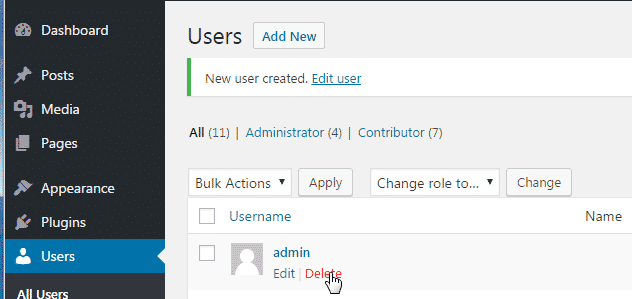
If you have an “admin” account in your WordPress installation, then you should seriously consider removing it. Renaming it is possible, and there is also a fairly common argument for stripping out the permissions but leaving the account intact – supposedly kind of a honey pot (albeit without the honey), but this just keeps an attacker engaged until they break into your site. The best course of action is to create a new user, give that user administration rights, then delete the previous one. Note, that on deleting the old admin account, you’ll be asked to attribute any content to another user – simply provide the new one you’ve created. See the below steps
Create the new user as shown below
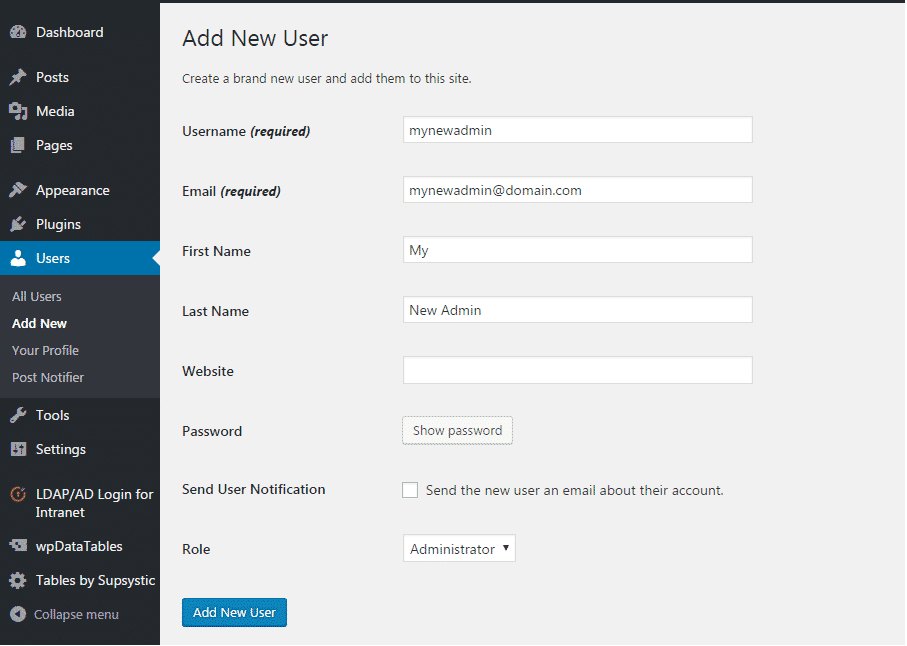
Logout of the WordPress admin console, and log back in as the new user- Assign any content to the new admin user
Step 2 - Change the admin account ID
The second part of securing the admin account against brute force is to change the ID that the account uses. This requires changing the database entry, so be careful.
NOTE – if you have posts written by the admin account that you are going to change the ID of, then it is important to reassign the author of these to another user. This site provides an excellent walk through of how to do just that, so I won’t be reinventing the wheel here ? Once you have a good database backup completed, you can then proceed to execute the below statements in MySQL to change the admin ID
UPDATE wp_users SET ID = 1024 WHERE ID = 1;The above syntax will change the ID of the admin user from 1 to 1024. Note, that for administrator accounts, the generally accepted mechanism is to choose a higher value – mainly due to the amount of time it will take to discover by any would-be attacker
UPDATE wp_usermeta SET user_id = 1024 WHERE user_id = 1;The above syntax will change the associated ID of the admin user in the table
wp_usermeta. Note, that the above commands make some assumptions – mainly that you are using the defaultwp_ prefixfor your WordPress installation. This in itself isn’t recommended by most sites, and there are a multitude of plugins that can address this issue if need be. You can complete the process manually, although this is a very advanced change, and you really need to be familiar with the platform in order to get things working again.Passwords
One of the major flaws with WordPress over the years is the ability to use a weak password. Sites that make use of a simple dictionary based password will find themselves compromised very quickly. The user may also find that they have been locked out of their installation by the same perpetrator who broke into it, and will effectively have lost control. This is known as a take over – kind of like squatting, but with the intention of applying malicious content (usually malware), and then turning the site into a command and control (or C2) centre that the attacker has control over.
A weak password also opens the floodgates for bruteforce attacks in WordPress.
Essentially, you keep hammering on the door with millions of passwords per second until you gain access. In this scenario, a successful attacker would then gain control over the system, and could install a plugin that allows direct access to the database from the GUI – and yes, these do exist. Once this access has been established, cyber criminals are in a position to steal confidential data. I can hear the wheels turning in your head now – confidential data on WordPress ? Yes. Think Mossac Fonseca, the Panamanian law firm. Using an outdated version of WordPress, the attackers were able to gain access to other systems using the compromised platform as a launchpad.
Directory and file permissions
The accepted platform for WordPress installations is generally Linux using the LAMP stack. Installations under Windows are perfectly feasible and possible, although extra effort is required in order to make PHP and MySQL work with Microsoft IIS. If you are intending on using Windows, then you should at least gain an understanding of what the numbers below actually mean
- All files should be 664
- All folders should be 775
wp-config.phpshould be 660
Those coming from windows environments should be already familiar with the dangers that Full Control presents – particular for public facing servers. The same applies to Linux – and not just the WordPress elements. Finding a balance is important, and the settings above are the accepted standard for all WordPress sites at the very least. It’s important to think of security as a sliding scale. The more you apply, the higher chance there is of unintentionally reducing or breaking the functionality that you set out to provide in the first place.
Very little attention is paid to the WordPress file system by the new or average user. Importantly, by default, the level of access afforded exceeds what is required for the site to function.
Seeing as most shared hosting facilities that offer WordPress platforms commonly leverage Linux, it makes sense to explain at this point how the operating system differs in terms of permissions in relation to Windows.
Linux uses a particular permissions structure known as “classes“. These are split into three distinct areas
- Owner – Usually always the creator of the files and/or folders.
- Group – The Group contains a selection of users who share the same permissions and privileges
- Others – The permissions that should be set for anyone outside of the above criteria (for example, public)
To understand how permissions function from a Linux perspective, look at the below
0 – nopermission
1 – execute
2 – write
3 – write and execute
4 – read
5 – read and execute
6 – read and write
7 – read, write, and executeEssentially, this dictates that 664 (for example) would equal read and write for owners, read and write for groups, and read only for everyone else. Similarly, 755 for a directory would equal read, write, and execute for owners, read and execute for groups, then finally, read and execute for everyone else.
Below is an example of what the default permissions (should) look like on a newly installed platform (the left hand side is a directory, and the right is an individual file). Under no circumstances should you grant 777 permission to files or folders – on a Linux system, this is the Windows equivalent of Everyone\Full Control. If you are not familiar with this term, it offers literally the highest level of permissions with no access control whatsoever. In this case, “everyone” literally means everyone – even those who you do not want to have unrestricted access. Leaving permissions set at 777 will leave your platform open to abuse and takeover. Think of it this way; “777” signifies a jackpot in gambling. In security terms, the jackpot is what any potential hacker hits when they find this unintentional gem.
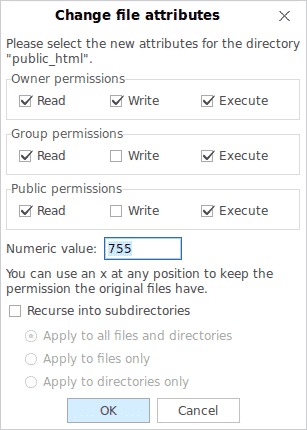
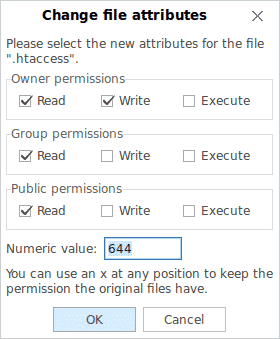
Certain directories should be secured using.htaccessconfigurations to prevent unauthorised access outside of the WordPress core. Some examples of how to configure depending on your needs are shown belowStep 3 - Block Bad IP Addresses
# Block one or more IP address. # Replace THISBADADDRESS with the one you really want to block <Limit GET POST> order allow,deny deny from THISHADADDRESS deny from THISBADADDRESS allow from all </Limit> Step 4 - Prevent directory browsing
One of the worst security offenders in WordPress is the ability to browse the file structure from the internet. Using this technique, an attacker can then gather reconnaissance information concerning the plugins in use on your site, then use this information to leverage known vulnerabilities against each of the plugins. Even worse, if the permissions allow, an attacker can also upload malicious content such as malware or ransomware. Look out for plugins (such as backup utilities) that typically place a
plugins.txtfile in your directory. This is invaluable to an attacker, as they now have a list of all plugins running on your site, and can formulate custom attacks based on these.Such an example of a poorly secured blog chosen at random (identity hidden) is as below
Attackers typically target the
wp-contentfolder looking for the directory browsing vulnerability. This can easily be prevented by modifying (or creating if it does not exist) the.htaccessfile within thewp-configdirectory so that it looks like the below

# Disable directory browsing Options All -Indexes This on it’s own is more than enough to prevent all directory browsing, but will also prevent various other media types from showing in your blog. To work around this, we need to flex the permissions a bit to make the files accessible to the blog, but not subject to directory browsing. An example of how we achieve this is shown below
Order deny,allow Deny from all <Files ~ ".(xml|css|jpe?g|png|gif|js|mp4|woff|woff2|ttf)$"> Allow from all </Files> Step 5 - Secure wp-config.php
This file is the first one to be read by WordPress during each site load. It also contains significant sensitive information that could be used by an attacker to gain access to your site and underlying database. For security reasons, it is always a good idea to move the wp-config.php file out of the public HTML area so that it cannot be parsed by a directory listing. If you’ve taken the steps above to secure WordPress against a directory listing probe, then arguably, a good portion of the risk is mitigated.
But, if it isn’t there at all, then it’s not subject to the above vulnerability. As a platform, WordPress will tolerate the
wp-config.phpfile being moved up one level, as it will automatically search one level above if the config file cannot be located in the expected position. Best practice is actually to place this file outside of the www root. There are a number of plugins that will stop working as a result of the wp-config file being relocated – to work around this, my personal preference is below- Move the wp-config config file to a location that only you can access.
- Rename the original wp-config.php file to something else – let’s say wp-config-main.php for the purposes of simplicity
- Create a new file named wp-config.php that contains the below
/** Absolute path to the WordPress directory. */ if ( !defined('ABSPATH') ) define('ABSPATH', dirname(__FILE__) . '/'); /** Location of your WordPress configuration. */ require_once(ABSPATH . '../wp-config-main.php'); What are we doing here ? In a nutshell, we are satisfying 2 requirements. We are addressing the security vulnerability, and at the same time, ensuring that our plugins will continue to function. All the code above does is include the real wp-config.php content when it is requested by the core, or a plugin. This is referred to as an SSI or Server Side Include.
Step 6 - Security Services
Sites such as CloudFlare can offer security services (mostly for free for small sites – although the function set is reduced), and is a great way to bolster the security services that may already be present on your site. A word of warning though – the CloudFlare curve isn’t an easy one to learn in a short space of time, and there are a number of plugins that conflict with (rather than compliment) this additional layer of security
Step 7 - Remove unnecessary plugins
This is kind of obvious, but only use the plugins that you absolutely cannot do without. In fact, most plugins offer functionality that can be written into a custom
functions.phpfile inside a child theme. If you are not using child themes, then you should look into doing this, as it means any custom changes you have made will survive an upgrade if the main theme you are using changes (updated, for example). It’s bad practice to change the core files directly – don’t do this, no matter how great the temptation is. If you have no use for a plugin, remove it. If a plugin hasn’t been updated in a long time, then this is a great indicator that you really should be looking for an alternative that is actively maintained.There are a number of security plugins on the WordPress scene which do an excellent job of securing the entire platform. A couple of examples are WordFence and iThemes Security (to name the most popular ones). These extend the core to a higher plane in terms of security, but they are not for the novice user in most aspects, and you really need to understand why the changes are being highlighted in the first place – which is really outside of the scope of this article. If you’d like more information about using
functions.phpor a detailed guide as to security plugins, do let me know.Have I missed anything (or better still, confused anyone) ? Let me know !
-
As you know I’m looking to do something on a wordpress installation hopefully soon.
There are some some b****y amazing tips there and lots of quality advice


 . I’ve used WordPress a lot over the years and I must say there’s still lots in there that I should have picked up on but hadn’t even thought of acting on before.
One of my websites was hacked a few years, probably a good 5-6 years back now and I feel most of the steps above if I’d have had Marks help and implemented the steps above then it may not have happened, anyway… one morning I visited my website and was greeted by a lovely green skull and crossbones that said something along the lines of “Your website has been taken over by such a such organisation”.
Now, to the best of my knowledge I couldn’t login, I had been hacked and rightly or wrongly proceeded to delete my files via FTP.
I’d lost hundreds of news stories I’d written and never trusted the domain again, would the hackers come back for more?
In my mind I’m thinking the best thing to do is to start again, and like a fool I didn’t have a recent backup of my wordpress installation.
I know Mark will go to town and have nightmares of all my rookie mistakes but after reading the blog I do feel a lot more confident if I was to use WordPress again that I’ve learnt a lot of what not to do and to not be too hasty next time.
-
As you know I’m looking to do something on a wordpress installation hopefully soon.
There are some some b****y amazing tips there and lots of quality advice


 . I’ve used WordPress a lot over the years and I must say there’s still lots in there that I should have picked up on but hadn’t even thought of acting on before.
One of my websites was hacked a few years, probably a good 5-6 years back now and I feel most of the steps above if I’d have had Marks help and implemented the steps above then it may not have happened, anyway… one morning I visited my website and was greeted by a lovely green skull and crossbones that said something along the lines of “Your website has been taken over by such a such organisation”.
Now, to the best of my knowledge I couldn’t login, I had been hacked and rightly or wrongly proceeded to delete my files via FTP.
I’d lost hundreds of news stories I’d written and never trusted the domain again, would the hackers come back for more?
In my mind I’m thinking the best thing to do is to start again, and like a fool I didn’t have a recent backup of my wordpress installation.
I know Mark will go to town and have nightmares of all my rookie mistakes but after reading the blog I do feel a lot more confident if I was to use WordPress again that I’ve learnt a lot of what not to do and to not be too hasty next time.
@jac This sounds like quite the horror story, but sadly, all too common.
@jac said in Hardening WordPress - Reducing the attack vector:
rightly or wrongly proceeded to delete my files via FTP .
This part is where I would have (if you knew me then) have stepped in and claimed back access to the site. The database was probably injected with malicious SQL, so wouldn’t be fit for production use, but it’s perfectly possible (and relatively simple) to get access back via a reset of the admin MD5 hashed password in the database itself.
@jac said in Hardening WordPress - Reducing the attack vector:
I’d lost hundreds of news stories I’d written
This is exactly my justification for writing this
@jac said in Hardening WordPress - Reducing the attack vector:
In my mind I’m thinking the best thing to do is to start again, and like a fool I didn’t have a recent backup of my wordpress installation.
This is why it’s of paramount importance to determine, design, configure, and set a backup and recovery strategy - and, as I mentioned in the article above, this needs to be tested periodically to ensure it is actually fit for purpose rather than simply relying on it being functional when you need it.
@jac said in Hardening WordPress - Reducing the attack vector:
I know Mark will go to town and have nightmares of all my rookie mistakes but after reading the blog I do feel a lot more confident if I was to use WordPress again that I’ve learnt a lot of what not to do and to not be too hasty next time.
 No, I won’t - really, I’ve seen this so many times, and one of the reasons as to why this platform exists in the first place is to educate, and ideally, eradicate.
 -
@jac This sounds like quite the horror story, but sadly, all too common.
@jac said in Hardening WordPress - Reducing the attack vector:
rightly or wrongly proceeded to delete my files via FTP .
This part is where I would have (if you knew me then) have stepped in and claimed back access to the site. The database was probably injected with malicious SQL, so wouldn’t be fit for production use, but it’s perfectly possible (and relatively simple) to get access back via a reset of the admin MD5 hashed password in the database itself.
@jac said in Hardening WordPress - Reducing the attack vector:
I’d lost hundreds of news stories I’d written
This is exactly my justification for writing this
https://content.sudonix.com/how-often-do-you-test-your-backups/
@jac said in Hardening WordPress - Reducing the attack vector:
In my mind I’m thinking the best thing to do is to start again, and like a fool I didn’t have a recent backup of my wordpress installation.
This is why it’s of paramount importance to determine, design, configure, and set a backup and recovery strategy - and, as I mentioned in the article above, this needs to be tested periodically to ensure it is actually fit for purpose rather than simply relying on it being functional when you need it.
@jac said in Hardening WordPress - Reducing the attack vector:
I know Mark will go to town and have nightmares of all my rookie mistakes but after reading the blog I do feel a lot more confident if I was to use WordPress again that I’ve learnt a lot of what not to do and to not be too hasty next time.
 No, I won’t - really, I’ve seen this so many times, and one of the reasons as to why this platform exists in the first place is to educate, and ideally, eradicate.
@phenomlab said in Hardening WordPress - Reducing the attack vector:
@jac This sounds like quite the horror story, but sadly, all too common.
@jac said in Hardening WordPress - Reducing the attack vector:
rightly or wrongly proceeded to delete my files via FTP .
This part is where I would have (if you knew me then) have stepped in and claimed back access to the site. The database was probably injected with malicious SQL, so wouldn’t be fit for production use, but it’s perfectly possible (and relatively simple) to get access back via a reset of the admin MD5 hashed password in the database itself.
@jac said in Hardening WordPress - Reducing the attack vector:
I’d lost hundreds of news stories I’d written
This is exactly my justification for writing this
@jac said in Hardening WordPress - Reducing the attack vector:
In my mind I’m thinking the best thing to do is to start again, and like a fool I didn’t have a recent backup of my wordpress installation.
This is why it’s of paramount importance to determine, design, configure, and set a backup and recovery strategy - and, as I mentioned in the article above, this needs to be tested periodically to ensure it is actually fit for purpose rather than simply relying on it being functional when you need it.
@jac said in Hardening WordPress - Reducing the attack vector:
I know Mark will go to town and have nightmares of all my rookie mistakes but after reading the blog I do feel a lot more confident if I was to use WordPress again that I’ve learnt a lot of what not to do and to not be too hasty next time.
 No, I won’t - really, I’ve seen this so many times, and one of the reasons as to why this platform exists in the first place is to educate, and ideally, eradicate.
Thanks for the reply mate.
It’s good to know that these problems can be fixed. I think at the time I just thought they’ll attack it again once I’ve launched something else so the best way was for me to get rid of if I’m afraid.
Now of course I’d do things differently


 .
. -
@phenomlab said in Hardening WordPress - Reducing the attack vector:
@jac This sounds like quite the horror story, but sadly, all too common.
@jac said in Hardening WordPress - Reducing the attack vector:
rightly or wrongly proceeded to delete my files via FTP .
This part is where I would have (if you knew me then) have stepped in and claimed back access to the site. The database was probably injected with malicious SQL, so wouldn’t be fit for production use, but it’s perfectly possible (and relatively simple) to get access back via a reset of the admin MD5 hashed password in the database itself.
@jac said in Hardening WordPress - Reducing the attack vector:
I’d lost hundreds of news stories I’d written
This is exactly my justification for writing this
https://content.sudonix.com/how-often-do-you-test-your-backups/
@jac said in Hardening WordPress - Reducing the attack vector:
In my mind I’m thinking the best thing to do is to start again, and like a fool I didn’t have a recent backup of my wordpress installation.
This is why it’s of paramount importance to determine, design, configure, and set a backup and recovery strategy - and, as I mentioned in the article above, this needs to be tested periodically to ensure it is actually fit for purpose rather than simply relying on it being functional when you need it.
@jac said in Hardening WordPress - Reducing the attack vector:
I know Mark will go to town and have nightmares of all my rookie mistakes but after reading the blog I do feel a lot more confident if I was to use WordPress again that I’ve learnt a lot of what not to do and to not be too hasty next time.
 No, I won’t - really, I’ve seen this so many times, and one of the reasons as to why this platform exists in the first place is to educate, and ideally, eradicate.
Thanks for the reply mate.
It’s good to know that these problems can be fixed. I think at the time I just thought they’ll attack it again once I’ve launched something else so the best way was for me to get rid of if I’m afraid.
Now of course I’d do things differently


 .
.@jac What you can (and 100% should) do if you run a WordPress site is strongly consider WP Shield - there is a free version, but PRO is obviously much better as it has greater capabilities and features
I’ve used this with huge success over the years, and it’s my preferred and recommended security solution for anyone with a WordPress site.
-
@jac What you can (and 100% should) do if you run a WordPress site is strongly consider WP Shield - there is a free version, but PRO is obviously much better as it has greater capabilities and features
https://getshieldsecurity.com/pricing/
I’ve used this with huge success over the years, and it’s my preferred and recommended security solution for anyone with a WordPress site.
@phenomlab said in Hardening WordPress - Reducing the attack vector:
@jac What you can (and 100% should) do if you run a WordPress site is strongly consider WP Shield - there is a free version, but PRO is obviously much better as it has greater capabilities and features
I’ve used this with huge success over the years, and it’s my preferred and recommended security solution for anyone with a WordPress site.
Absolutely! I can’t remember what I used to use last time but it was free. Most likely the mist downloaded security solution.
Talking of security, somebody tried to access my emails before so I reset the password etc although I do feel I need to maybe use a password generator or something to be more secure.
-
@phenomlab said in Hardening WordPress - Reducing the attack vector:
@jac What you can (and 100% should) do if you run a WordPress site is strongly consider WP Shield - there is a free version, but PRO is obviously much better as it has greater capabilities and features
https://getshieldsecurity.com/pricing/
I’ve used this with huge success over the years, and it’s my preferred and recommended security solution for anyone with a WordPress site.
Absolutely! I can’t remember what I used to use last time but it was free. Most likely the mist downloaded security solution.
Talking of security, somebody tried to access my emails before so I reset the password etc although I do feel I need to maybe use a password generator or something to be more secure.
@jac said in Hardening WordPress - Reducing the attack vector:
Talking of security, somebody tried to access my emails before so I reset the password etc although I do feel I need to maybe use a password generator or something to be more secure.
This is s slightly different topic, but it’s just as important. In most cases, the best advice is
- Use a password manager to generate a strong password. You don’t need to remember it - that’s the job of the password manager itself
- Enforce two factor authentication for your email accounts (most have this). In this case, should an attacker get access to your username and password, they still will not be able to login without the second factor which is typically a 6 digit code that changes every 30 seconds
It’s important to note that two factor via SMS is in fact inherently weak and should be avoided - it’s always best at minimum to use a TOTP mechanism with something like AUTHY or Google Authenticator.
-
@jac said in Hardening WordPress - Reducing the attack vector:
Talking of security, somebody tried to access my emails before so I reset the password etc although I do feel I need to maybe use a password generator or something to be more secure.
This is s slightly different topic, but it’s just as important. In most cases, the best advice is
- Use a password manager to generate a strong password. You don’t need to remember it - that’s the job of the password manager itself
- Enforce two factor authentication for your email accounts (most have this). In this case, should an attacker get access to your username and password, they still will not be able to login without the second factor which is typically a 6 digit code that changes every 30 seconds
It’s important to note that two factor via SMS is in fact inherently weak and should be avoided - it’s always best at minimum to use a TOTP mechanism with something like AUTHY or Google Authenticator.
@phenomlab said in Hardening WordPress - Reducing the attack vector:
@jac said in Hardening WordPress - Reducing the attack vector:
Talking of security, somebody tried to access my emails before so I reset the password etc although I do feel I need to maybe use a password generator or something to be more secure.
This is s slightly different topic, but it’s just as important. In most cases, the best advice is
- Use a password manager to generate a strong password. You don’t need to remember it - that’s the job of the password manager itself
- Enforce two factor authentication for your email accounts (most have this). In this case, should an attacker get access to your username and password, they still will not be able to login without the second factor which is typically a 6 digit code that changes every 30 seconds
It’s important to note that two factor via SMS is in fact inherently weak and should be avoided - it’s always best at minimum to use a TOTP mechanism with something like AUTHY or Google Authenticator.
Thanks for all the great advice mate appreciate it.
I’ll follow it all up when home

 .
. -
@phenomlab said in Hardening WordPress - Reducing the attack vector:
@jac said in Hardening WordPress - Reducing the attack vector:
Talking of security, somebody tried to access my emails before so I reset the password etc although I do feel I need to maybe use a password generator or something to be more secure.
This is s slightly different topic, but it’s just as important. In most cases, the best advice is
- Use a password manager to generate a strong password. You don’t need to remember it - that’s the job of the password manager itself
- Enforce two factor authentication for your email accounts (most have this). In this case, should an attacker get access to your username and password, they still will not be able to login without the second factor which is typically a 6 digit code that changes every 30 seconds
It’s important to note that two factor via SMS is in fact inherently weak and should be avoided - it’s always best at minimum to use a TOTP mechanism with something like AUTHY or Google Authenticator.
Thanks for all the great advice mate appreciate it.
I’ll follow it all up when home

 .
.@jac No problem. I’m happy to put together a blog post for this if you think there’s a benefit ?
-
@jac No problem. I’m happy to put together a blog post for this if you think there’s a benefit ?
@phenomlab said in Hardening WordPress - Reducing the attack vector:
@jac No problem. I’m happy to put together a blog post for this if you think there’s a benefit ?
Absolutely matey, that’s up to you pal I’ve just followed the advice and used Microsoft’s authentication app that’s enabled two factor authentication.
-
@phenomlab said in Hardening WordPress - Reducing the attack vector:
@jac No problem. I’m happy to put together a blog post for this if you think there’s a benefit ?
Absolutely matey, that’s up to you pal I’ve just followed the advice and used Microsoft’s authentication app that’s enabled two factor authentication.
@jac said in Hardening WordPress - Reducing the attack vector:
Microsoft’s authentication app that’s enabled two factor authentication.
Or is Google’s better?
-
@jac said in Hardening WordPress - Reducing the attack vector:
Microsoft’s authentication app that’s enabled two factor authentication.
Or is Google’s better?
@jac Microsoft’s and Google’s Authenticator both support TOTP - essentially, a time based system that changes every 30 seconds. The main principle here is that the device itself carrying the One Time Passcode only needs to be in sync with the source server in terms of time, and can be completely offline with no internet access.
Provided the time matches on both devices, the One Time Passcode will be accepted. Applications such as Microsoft Authenticator and Authy also support push notification meaning you just choose either yes or no on your device when prompted, and then that response is sent back to the origin which then determines if access is granted or not.
One of the best looking password less authentication models was CLEF - sadly, this product died out due to a lack of funding (if I recall correctly) although some open source implementations of this have appeared quite recently.
Essentially, both products will achieve the same goal. TOTP is an industry standard, and widely accepted across the board. Not all services offer push confirmation.
-
@jac Microsoft’s and Google’s Authenticator both support TOTP - essentially, a time based system that changes every 30 seconds. The main principle here is that the device itself carrying the One Time Passcode only needs to be in sync with the source server in terms of time, and can be completely offline with no internet access.
Provided the time matches on both devices, the One Time Passcode will be accepted. Applications such as Microsoft Authenticator and Authy also support push notification meaning you just choose either yes or no on your device when prompted, and then that response is sent back to the origin which then determines if access is granted or not.
One of the best looking password less authentication models was CLEF - sadly, this product died out due to a lack of funding (if I recall correctly) although some open source implementations of this have appeared quite recently.
Essentially, both products will achieve the same goal. TOTP is an industry standard, and widely accepted across the board. Not all services offer push confirmation.
@phenomlab said in Hardening WordPress - Reducing the attack vector:
@jac Microsoft’s and Google’s Authenticator both support TOTP - essentially, a time based system that changes every 30 seconds. The main principle here is that the device itself carrying the One Time Passcode only needs to be in sync with the source server in terms of time, and can be completely offline with no internet access.
Provided the time matches on both devices, the One Time Passcode will be accepted. Applications such as Microsoft Authenticator and Authy also support push notification meaning you just choose either yes or no on your device when prompted, and then that response is sent back to the origin which then determines if access is granted or not.
One of the best looking password less authentication models was CLEF - sadly, this product died out due to a lack of funding (if I recall correctly) although some open source implementations of this have appeared quite recently.
Essentially, both products will achieve the same goal. TOTP is an industry standard, and widely accepted across the board. Not all services offer push confirmation.
Many thanks for the detailed reply mate.
There’s some great advice in there that will help me secure my accounts.
Hello! It looks like you're interested in this conversation, but you don't have an account yet.
Getting fed up of having to scroll through the same posts each visit? When you register for an account, you'll always come back to exactly where you were before, and choose to be notified of new replies (ether email, or push notification). You'll also be able to save bookmarks, use reactions, and upvote to show your appreciation to other community members.
With your input, this post could be even better 💗
RegisterLog in
