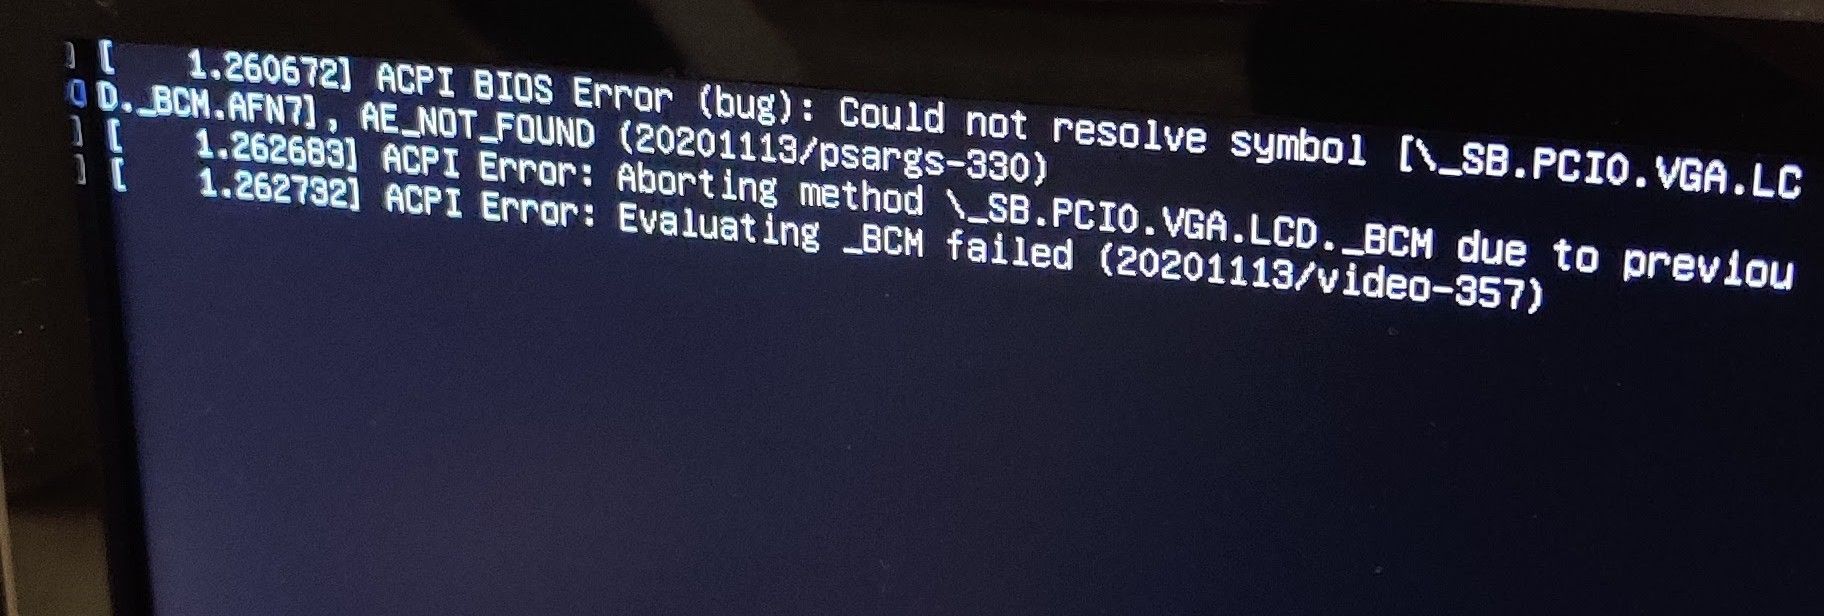
Repeated application crashes? You might need a Swap file
Performance
Posts
1
Posts
Posters
1
Posters
Views
1.1k
Views
Watching
1
Watching
-
Lower grade VPS instances, whilst cheap, do have the inherent issue in the fact that they only have 1Gb of RAM. In most cases, this is enough for relatively small or minor projects, but when you need more RAM that you actually have, you’ll quickly find that instance exhausted, and your applications crashing as a result.
This is where the
swapfile comes into play. Adding aswapcan significantly improve performance on low budget hosts, but without directrootaccess, this is not going to be possible. If you own a VPS that hasrootlevel access and need to add aswap, follow the below guide.First, what exactly is a Swap?
swapis a section of hard disk space that has been set reserved for the operating system to temporarily store data that it is unable to hold in RAM. This step allows you increase the amount of information that your server can keep in its working memory (but not without with some caveats, which I’ll explain below). The swap space on the hard disk will be used mostly when there is no more sufficient space in RAM to host any in-use application data.The information written to disk will be far slower than information kept in RAM (RAM is superior in terms of speed owing to its architecture), but the operating system will prefer to keep running application data in memory and only use the
swapfor the older data. Essentially, havingswapspace as a failsafe for when your system’s physical memory is depleted can be a good safety net against crashes on systems with non-SSD storage available.Determine the size of the Swap we actually need.
This process is made so much easier by using the below calculator
Admittedly, if you only had 1Gb RAM, the SWAP would be default at 1Gb. You can play with the various configurations here to get the results you need, but be honest - don’t make your system out to be something it isn’t, because otherwise, you’ll create more problems than you set out to resolve.
Swap space refers to a designated portion of hard drive storage that’s reserved for temporary data storage by the operating system when the RAM can’t accommodate it any longer. This allows for an expansion of the data that your server can hold in its active memory, though with certain conditions. The swap area on the hard drive comes into play primarily when there isn’t enough room left in the RAM to hold active application data.
The data that gets written to the disk is notably slower than the data stored in RAM. Nevertheless, the operating system prioritizes keeping currently used application data in memory and employs swap for older data. Having swap space as a fallback when your system’s RAM is exhausted can serve as a valuable safeguard against out-of-memory errors, especially on systems with traditional non-SSD storage.
Verifying the System for Swap Information
Before proceeding, it’s advisable to confirm whether your system already has existing swap space. While it’s possible to have multiple swap files or swap partitions, typically one should suffice.
You can check if your system has any configured swap by executing:
sudo swapon --showIf you receive no output, it means your system presently lacks swap space.
You can also confirm the absence of active swap using the free utility:
free -hAs evident in the output, there is no active swap on the system, as shown in the Swap row.
total used free shared buff/cache available Mem: 981Mi 122Mi 647Mi 0.0Ki 211Mi 714Mi SWAP: 0B 0B 0B Assessing Available Space on the Hard Drive Partition
Before creating a swap file, it’s essential to check the current disk usage to ensure you have enough available space. This can be done by entering
df -hFilesystem Size Used Avail Use% Mounted on tmpfs 1.6G 876K 1.6G 1% /run /dev/sda1 150G 65G 80G 45% / tmpfs 7.7G 0 7.7G 0% /dev/shm tmpfs 5.0M 0 5.0M 0% /run/lock /dev/sda15 253M 6.1M 246M 3% /boot/efi tmpfs 1.6G 0 1.6G 0% /run/user/1009 The device with / in the Mounted on column is our disk in this case. We have sufficient remaining space available - 65G used. Your availability will obviously be different.
The appropriate size of a swap space can vary according to personal preferences and application requirements. Typically, an amount equivalent to or double the system’s RAM is a good starting point. For a simple RAM fallback, anything over 4G of swap is usually deemed unnecessary.
Creating a Swap File
Now that you’ve determined the available hard drive space, you can generate a swap file on your file system. A file of your desired size, named ‘swapfile,’ will be allocated in your root directory (/).
The recommended method for creating a swap file is by using the fallocate program, which instantly generates a file of the specified size. For instance, if your server has 1G of RAM, you can create a 1G file as follows:
sudo fallocate -l 1G /swapfileYou can confirm the correct space allocation by running:
ls -lh /swapfileThe file will be created with the appropriate space allocation.
Activating the Swap File
Now that you have a correctly sized file, it’s time to turn it into swap space. Initially, you must restrict file access to only root users, enhancing security. To achieve this, execute:
sudo chmod 600 /swapfileYou can verify the permission change with:
ls -lh /swapfileAs seen in the output, only the root user has read and write permissions.
Next, mark the file as swap space with:
sudo mkswap /swapfileAfterward, enable the swap file to allow your system to utilize it:
sudo swapon /swapfileYou can verify the availability of swap by executing:
sudo swapon --showFinally, recheck the output of the free utility to confirm the setup:
free -hMaking the Swap File Permanent
The changes made enable the swap file for the current session, but they won’t persist through a system reboot. To ensure your swap settings remain, you can add the swap file information to your
/etc/fstabfile. Here’s how you can do it:Back up the
/etc/fstabfile as a precaution:sudo cp /etc/fstab /etc/fstab.bakAdd the swap file information to the end of your
/etc/fstabfile with:echo '/swapfile none swap sw 0 0' | sudo tee -a /etc/fstabAdjusting Swap Settings
There are several settings you can configure to influence your system’s performance with swap. Two key settings are the swappiness property and the cache pressure setting:
Swappiness Property: This parameter determines how often data is swapped from RAM to the swap space. A value between 0 and 100 represents a percentage. Lower values (close to 0) mean less frequent swapping, while higher values (closer to 100) encourage more swapping. You can check the current swappiness value with:
cat /proc/sys/vm/swappinessYou can set a different value using the
sysctlcommand. For example, to set the swappiness to 10:sudo sysctl vm.swappiness=10This setting persists until the next reboot, but you can make it permanent by adding it to your
/etc/sysctl.conffile.Cache Pressure Setting: This setting affects how the system caches inode and dentry information over other data. Lower values, like 50, make the system cache this information more conservatively. You can check the current cache pressure value with:
cat /proc/sys/vm/vfs_cache_pressureTo set a different value, use the sysctl command and update your
/etc/sysctl.conffile as you did with the swappiness setting. -
undefined phenomlab marked this topic as a regular topic on 24 Oct 2023, 16:07

Hello! It looks like you're interested in this conversation, but you don't have an account yet.
Getting fed up of having to scroll through the same posts each visit? When you register for an account, you'll always come back to exactly where you were before, and choose to be notified of new replies (ether email, or push notification). You'll also be able to save bookmarks, use reactions, and upvote to show your appreciation to other community members.
With your input, this post could be even better 💗
RegisterLog in