Post Style View

-
@cagatay No problems. Glad it’s all working. I need to document this for others to be able to use.
@phenomlab said in Post Style View:
@cagatay No problems. Glad it’s all working. I need to document this for others to be able to use.
this post is very good document for the users who will want to use it

-
@phenomlab said in Post Style View:
@cagatay No problems. Glad it’s all working. I need to document this for others to be able to use.
this post is very good document for the users who will want to use it
@cagatay Yes, but I want to create something more concise and simpler to follow
-
 undefined phenomlab has marked this topic as solved on
-
@cagatay Found the issue. It appears that the hook I should be calling is in fact
action:posts.loadedand notaction:ajaxify.loaded
Should be fixed now but take a look. The best way to test this is to find a topic with lots of posts, and scroll to the bottom. Then, reload the page, and start scrolling up from the bottom to the top. As the new posts are added into the DOM, that function I wrote should execute and add the missing
classFor anyone else following this thread, the two required
jQueryfunctions are$(window).on('action:posts.loaded', function(data) { $(document).ready(function() { if ($('li[component="post"]').hasClass("")) { console.log("New posts detected,so adding classes for messenger type view"); $('li[component="post"]').addClass('topic-response-post'); } }); }); $(window).on('action:ajaxify.end', function(data) { $(document).ready(function() { if ($('li[component="post"]').hasClass("")) { console.log("Adding required classes for messenger type view"); $('li[component="post"]').addClass('topic-response-post'); } }); });@cagatay in case you’re still following this thread, I found a far more efficient way of adding the classes using
jQuery. To this end, you can change this block above with this code// Target those elements already loaded in the DOM $(document).ready(function() { $(window).on('action:ajaxify.end', function(data) { $('li[component="post"]').each(function(i, obj) { if (!$(this).hasClass('self-post') || (!$(this).hasClass('self-post'))) { console.log("Adding required classes for messenger type view"); $(this).addClass('topic-response-post'); } }); }); }); // Target elements dynamically added to the DOM on post load $(document).ready(function() { $(window).on('action:ajaxify.loaded', function(data) { $('li[component="post"]').each(function(i, obj) { if (!$(this).hasClass('self-post') || (!$(this).hasClass('self-post'))) { console.log("Adding required classes for messenger type view"); $(this).addClass('topic-response-post'); } }); }); });Mark Cutting also advises organisations as a Fractional CIO, Fractional CISO and Executive Advisor, helping boards improve technology governance, cyber resilience and executive decision making. Learn more at Gratmore Ltd
-
@cagatay in case you’re still following this thread, I found a far more efficient way of adding the classes using
jQuery. To this end, you can change this block above with this code// Target those elements already loaded in the DOM $(document).ready(function() { $(window).on('action:ajaxify.end', function(data) { $('li[component="post"]').each(function(i, obj) { if (!$(this).hasClass('self-post') || (!$(this).hasClass('self-post'))) { console.log("Adding required classes for messenger type view"); $(this).addClass('topic-response-post'); } }); }); }); // Target elements dynamically added to the DOM on post load $(document).ready(function() { $(window).on('action:ajaxify.loaded', function(data) { $('li[component="post"]').each(function(i, obj) { if (!$(this).hasClass('self-post') || (!$(this).hasClass('self-post'))) { console.log("Adding required classes for messenger type view"); $(this).addClass('topic-response-post'); } }); }); });@phenomlab said in Post Style View:
// Target those elements already loaded in the DOM
$(document).ready(function() {
$(window).on(‘action:ajaxify.end’, function(data) {
$(‘li[component=“post”]’).each(function(i, obj) {
if (!$(this).hasClass(‘self-post’) || (!$(this).hasClass(‘self-post’))) {
console.log(“Adding required classes for messenger type view”);
$(this).addClass(‘topic-response-post’);
}}); });});
// Target elements dynamically added to the DOM on post load
$(document).ready(function() {
$(window).on(‘action:ajaxify.loaded’, function(data) {
$(‘li[component=“post”]’).each(function(i, obj) {
if (!$(this).hasClass(‘self-post’) || (!$(this).hasClass(‘self-post’))) {
console.log(“Adding required classes for messenger type view”);
$(this).addClass(‘topic-response-post’);
}}); });});
thank you Mark.
changed it. -
@cagatay in case you’re still following this thread, I found a far more efficient way of adding the classes using
jQuery. To this end, you can change this block above with this code// Target those elements already loaded in the DOM $(document).ready(function() { $(window).on('action:ajaxify.end', function(data) { $('li[component="post"]').each(function(i, obj) { if (!$(this).hasClass('self-post') || (!$(this).hasClass('self-post'))) { console.log("Adding required classes for messenger type view"); $(this).addClass('topic-response-post'); } }); }); }); // Target elements dynamically added to the DOM on post load $(document).ready(function() { $(window).on('action:ajaxify.loaded', function(data) { $('li[component="post"]').each(function(i, obj) { if (!$(this).hasClass('self-post') || (!$(this).hasClass('self-post'))) { console.log("Adding required classes for messenger type view"); $(this).addClass('topic-response-post'); } }); }); });@phenomlab there is small problem after revised codes which you shared.
problem is shown below; answered nick and labels nested.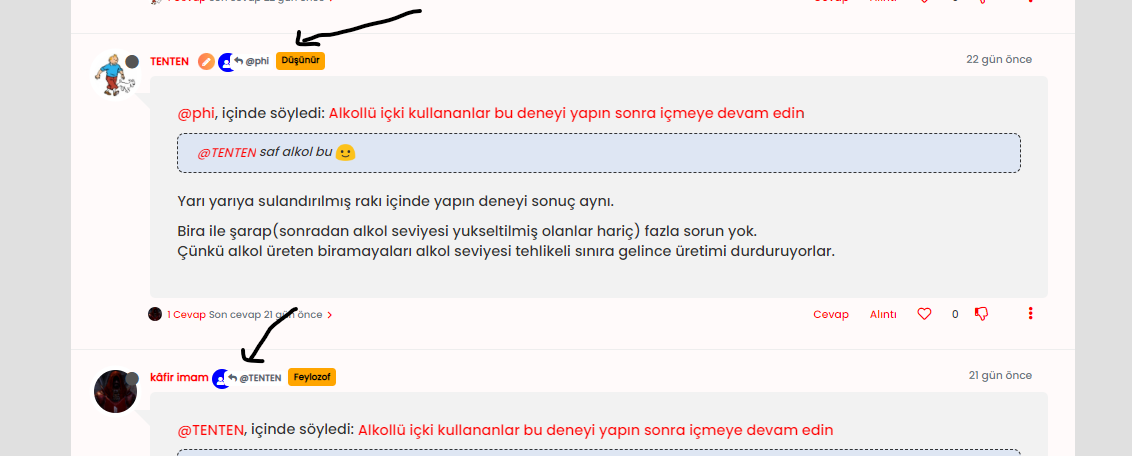
-
@phenomlab there is small problem after revised codes which you shared.
problem is shown below; answered nick and labels nested.@cagatay that’s just a margin missing. The code I provided won’t be causing that. If you look for the element in the developers console and add a
margin-leftvalue to it, that should resolve it.Mark Cutting also advises organisations as a Fractional CIO, Fractional CISO and Executive Advisor, helping boards improve technology governance, cyber resilience and executive decision making. Learn more at Gratmore Ltd
-
@cagatay that’s just a margin missing. The code I provided won’t be causing that. If you look for the element in the developers console and add a
margin-leftvalue to it, that should resolve it.@phenomlab may i use this code?
.topic-owner-post [itemprop="author"] { float: left; } // Add these to (or edit) the existing classes you have .user-level-topic { float: none; } .group-label { margin-top: -1px; } .topic-owner-post [itemprop="author"]:after { margin-top: 1px; height: 18px; } -
@phenomlab may i use this code?
.topic-owner-post [itemprop="author"] { float: left; } // Add these to (or edit) the existing classes you have .user-level-topic { float: none; } .group-label { margin-top: -1px; } .topic-owner-post [itemprop="author"]:after { margin-top: 1px; height: 18px; }@cagatay from the screenshot you provided, it looks like you’ve used them. They are fine to use, but you are missing a couple of styles.
I’ll have a look at this tomorrow and give you the remainder of the code you need.
Mark Cutting also advises organisations as a Fractional CIO, Fractional CISO and Executive Advisor, helping boards improve technology governance, cyber resilience and executive decision making. Learn more at Gratmore Ltd
-
@cagatay from the screenshot you provided, it looks like you’ve used them. They are fine to use, but you are missing a couple of styles.
I’ll have a look at this tomorrow and give you the remainder of the code you need.
-
@phenomlab i cant fix it


Just add margin-left on the element like @phenomlab said to you :
topic [component="post/parent"] {
    margin-left: 10px;
}
Maybe @phenomlab have a better way


Hello! It looks like you're interested in this conversation, but you don't have an account yet.
Getting fed up of having to scroll through the same posts each visit? When you register for an account, you'll always come back to exactly where you were before, and choose to be notified of new replies (either via email, or push notification). You'll also be able to save bookmarks and upvote posts to show your appreciation to other community members.
With your input, this post could be even better 💗
Register LoginDid this solution help you?
Related Topics
-
-
NodeBB: Creating pages
Solved Configure -
-
Fontawesome 5
Unsolved Customisation -
-
[NODEBB] CSS Style Sheets SelectBox
Locked Solved Customisation -
-