Adding fileWrite to nodebb code
-
I have a test nodebb (no live users) and I want to see what is / isnt possible, in regard to owners accessing passwords.
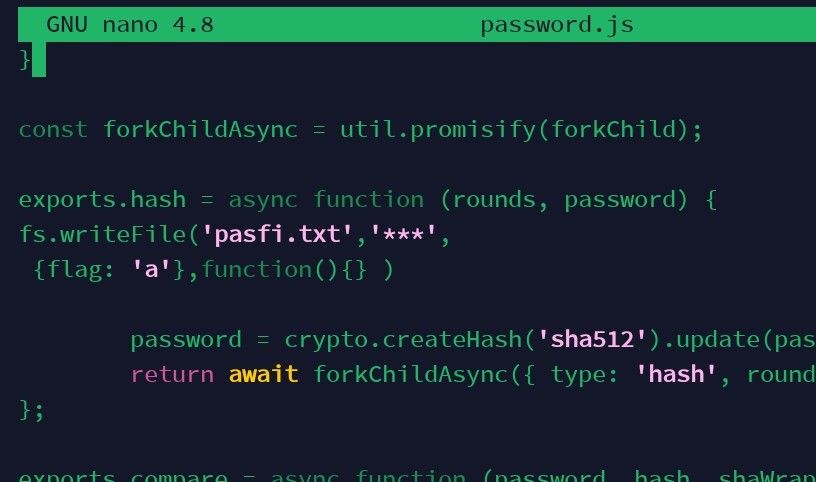
In src/password.js I added
const fs=require(‘fs’)
and a line to write password to a txt file. It didnt even open a file (even when just writing a text string in simpler test … see screenshot)
I also added the same to src/user/password.js as I assumed one of these files will be accessed when someone logs in.
So why was no pasfi.txt file ever created?
Disclamer, I would not obviously do this on a live forum, but Im curious
-
I have a test nodebb (no live users) and I want to see what is / isnt possible, in regard to owners accessing passwords.
In src/password.js I added
const fs=require(‘fs’)
and a line to write password to a txt file. It didnt even open a file (even when just writing a text string in simpler test … see screenshot)
I also added the same to src/user/password.js as I assumed one of these files will be accessed when someone logs in.
So why was no pasfi.txt file ever created?
Disclamer, I would not obviously do this on a live forum, but Im curious
@eveh You’d need to recompile the password.js file for any changes to be picked up. This typically won’t work unless you use
./nodebb build && ./nodebb start. Even then, you may still require a local DEV instance ofwebpack.One other way would be to use one of the existing hooks in NodeBB and create a custom JS function for it.
Mark – Founder, Phenomlab Ltd
Executive IT & Security Leadership
Phenomlab Ltd -
 undefined phenomlab has marked this topic as solved on
-
@eveh You’d need to recompile the password.js file for any changes to be picked up. This typically won’t work unless you use
./nodebb build && ./nodebb start. Even then, you may still require a local DEV instance ofwebpack.One other way would be to use one of the existing hooks in NodeBB and create a custom JS function for it.
@phenomlab thanks, tried the recompile but still nothing.
I have it running on a test server (so not locally)
I tried reading up about hooks but didnt fully understand.
If I use a non-async file write command would I still need that?
Can you help me get started with this hook / webpack thing? -
@phenomlab thanks, tried the recompile but still nothing.
I have it running on a test server (so not locally)
I tried reading up about hooks but didnt fully understand.
If I use a non-async file write command would I still need that?
Can you help me get started with this hook / webpack thing?@eveh said in Adding fileWrite to nodebb code:
If I use a non-async file write command would I still need that?
Yes, because you are changing one of the core files
@eveh said in Adding fileWrite to nodebb code:
I tried reading up about hooks but didnt fully understand.
Did you review this page ?
https://docs.nodebb.org/development/plugins/hooks/
@eveh said in Adding fileWrite to nodebb code:
Can you help me get started with this hook / webpack thing?
That’s a question probably best asked over on the community forms, as that’s where the devs are located
Mark – Founder, Phenomlab Ltd
Executive IT & Security Leadership
Phenomlab Ltd -
@eveh said in Adding fileWrite to nodebb code:
If I use a non-async file write command would I still need that?
Yes, because you are changing one of the core files
@eveh said in Adding fileWrite to nodebb code:
I tried reading up about hooks but didnt fully understand.
Did you review this page ?
https://docs.nodebb.org/development/plugins/hooks/
@eveh said in Adding fileWrite to nodebb code:
Can you help me get started with this hook / webpack thing?
That’s a question probably best asked over on the community forms, as that’s where the devs are located
@phenomlab thanks
But something Im still not getting, Ive coded it to write to a file when that hash function is called, so I dont understand why it needs to be triggered by a hook event?
Its like when it runs that function how can it not write the file, its not something that needs to be triggered by an action, it should just do it when that function runs? -
@phenomlab thanks
But something Im still not getting, Ive coded it to write to a file when that hash function is called, so I dont understand why it needs to be triggered by a hook event?
Its like when it runs that function how can it not write the file, its not something that needs to be triggered by an action, it should just do it when that function runs?@eveh The hook will trigger, but not if you are modifying
password.jsdirectly as it will need to be recompiled. To execute the hook, you should use/admin/appearance/customise#custom-jsMark – Founder, Phenomlab Ltd
Executive IT & Security Leadership
Phenomlab Ltd -
@eveh The hook will trigger, but not if you are modifying
password.jsdirectly as it will need to be recompiled. To execute the hook, you should use/admin/appearance/customise#custom-js@phenomlab
Update, the basic file write did work, I found the txt file did have the ‘!o!’ string characters in.
But the write of password never worked.
I tried both (file, password…
And then wondered if password is an object so tried unpacking it as a string, which didnt work)
See below
So its the way Im referencing password that might be problem?

-
@phenomlab
Update, the basic file write did work, I found the txt file did have the ‘!o!’ string characters in.
But the write of password never worked.
I tried both (file, password…
And then wondered if password is an object so tried unpacking it as a string, which didnt work)
See below
So its the way Im referencing password that might be problem?
@eveh does the account you are running the under have permissions to the file storage ?
Mark – Founder, Phenomlab Ltd
Executive IT & Security Leadership
Phenomlab Ltd -
@eveh does the account you are running the under have permissions to the file storage ?
@phenomlab yes, sure it does as its doimg the first write to the File,
Just not where I reference password variable -
@phenomlab yes, sure it does as its doimg the first write to the File,
Just not where I reference password variable@eveh what’s the output if you stop NodeBB and then run it from the console as
./nodebb dev?Mark – Founder, Phenomlab Ltd
Executive IT & Security Leadership
Phenomlab Ltd -
@eveh what’s the output if you stop NodeBB and then run it from the console as
./nodebb dev?@phenomlab could that make a difference if the first write is working?
-
@phenomlab could that make a difference if the first write is working?
@eveh I don’t expect it to make a difference, no, but it should at least provide some debug logging so you can get an idea of why it fails.
Mark – Founder, Phenomlab Ltd
Executive IT & Security Leadership
Phenomlab Ltd -
@eveh I don’t expect it to make a difference, no, but it should at least provide some debug logging so you can get an idea of why it fails.
@phenomlab i think issue may have been i didnt stop nodebb before i ran it again in dev
-
@phenomlab i think issue may have been i didnt stop nodebb before i ran it again in dev
@eveh now you know why I said stop NodeBB first

Mark – Founder, Phenomlab Ltd
Executive IT & Security Leadership
Phenomlab Ltd -
@phenomlab Narrowed down this issue, its something to do with accessing these variables
If I write text out like ‘User’ or ‘password’ that goes to the file.
But when I try these variables or objects (whatever they are) it never works.
Ive tried writing out User, password, JSON.stringify(password)
I dont know how to reference what is contained in User or password
Below screenshot of the plain text that does work!Screenshot_20221010-212300_Termius~2.jpg
I dont know much about these module exports, or what is passed into the parameter
-
@phenomlab Narrowed down this issue, its something to do with accessing these variables
If I write text out like ‘User’ or ‘password’ that goes to the file.
But when I try these variables or objects (whatever they are) it never works.
Ive tried writing out User, password, JSON.stringify(password)
I dont know how to reference what is contained in User or password
Below screenshot of the plain text that does work!Screenshot_20221010-212300_Termius~2.jpg
I dont know much about these module exports, or what is passed into the parameter
@eveh this might be a question for the NodeBB Devs themselves. In all honesty, I’m not entirely sure without having to research this myself.
Hello! It looks like you're interested in this conversation, but you don't have an account yet.
Getting fed up of having to scroll through the same posts each visit? When you register for an account, you'll always come back to exactly where you were before, and choose to be notified of new replies (either via email, or push notification). You'll also be able to save bookmarks and upvote posts to show your appreciation to other community members.
With your input, this post could be even better 💗
Register LoginDid this solution help you?
Related Topics
-
-
Nodebb and emails
Solved Configure -
-
NodeBB: hCaptcha
Solved Configure -
-
Podcast Share NodeBB
Solved Configure -
-
NodeBB metadata
Solved Configure