Upgrade Problem from 2.8.3 to 2.8.4
-
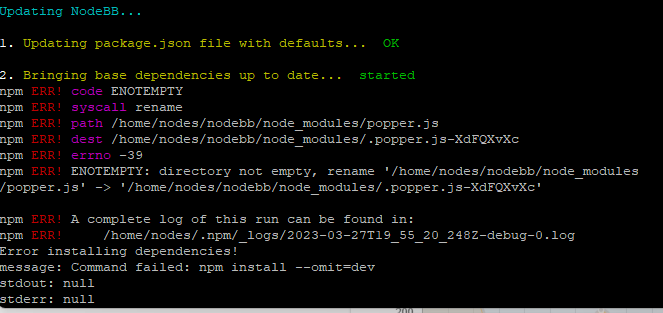
This is my problem that faced when upgrade from 2.8.3 to 2.8.4.
-
You are getting that message because you have the three plugins below installed which all depend on nodebb-plugin-emoji so you cannot remove the main plugin without first removing those

I’ve done it for you anyway

You should be able to upgrade now.
-
@cagatay that looks very much like a permissions error. Are you attempting the upgrade as the user running NodeBB ?
Mark – Founder, Phenomlab Ltd
Executive IT & Security Leadership
Phenomlab Ltd -
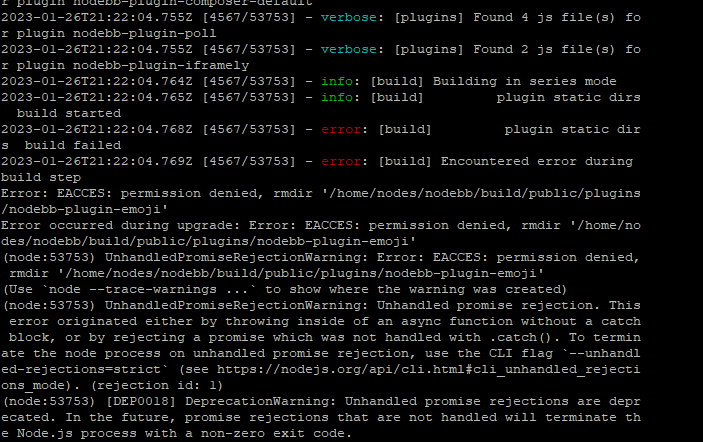
Seems to be a permission problem.
test
./nodebb upgradecommand withrootuser. (not good but I have this problem one time ago resolved like this) (Mark will yell at me )go to normal nodebb user and
./nodebb upgradeagain -
@cagatay that looks very much like a permissions error. Are you attempting the upgrade as the user running NodeBB ?
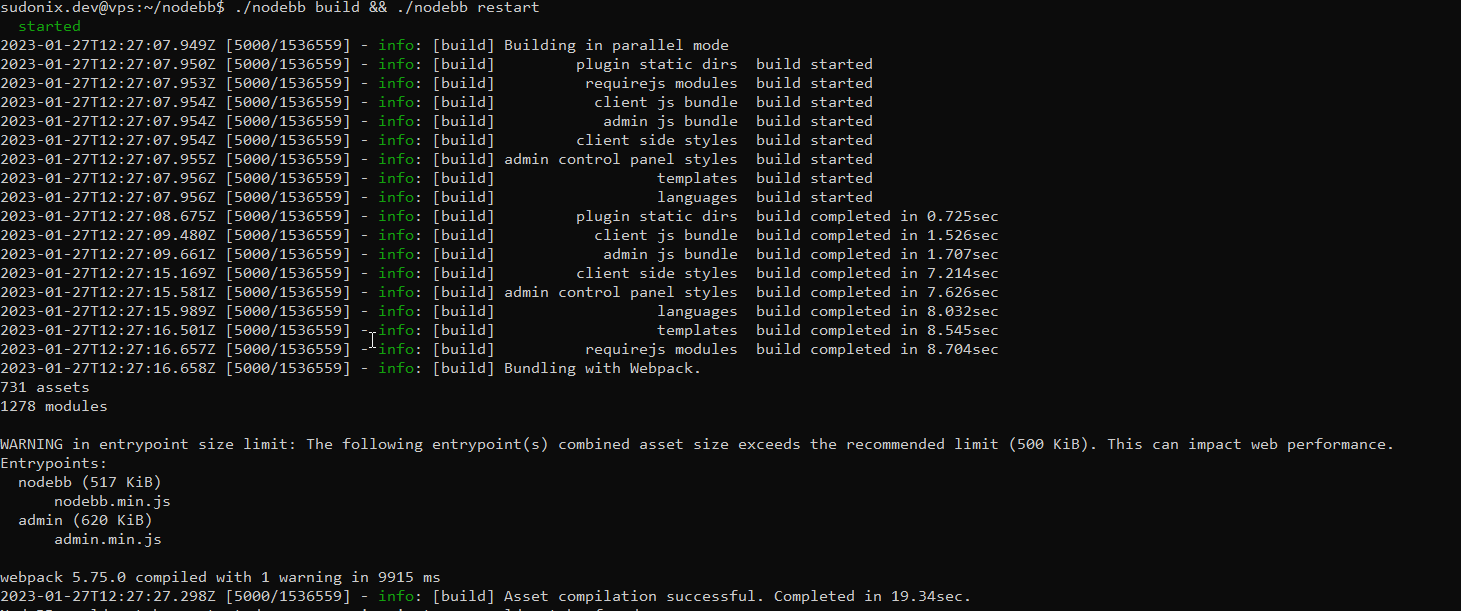
@phenomlab its very interesting but upgrade is done when i login admin panel and nodebb is working without problem.
so sould i upgrade again by root?
PS: i always use user not root but user has sudo command
-
@phenomlab its very interesting but upgrade is done when i login admin panel and nodebb is working without problem.
so sould i upgrade again by root?
PS: i always use user not root but user has sudo command
@cagatay If the upgrade appears to have worked, then you don’t need to run it again, but I would certainly take a look at the
nodebb-plugin-emojiissue in more detail as this is 100% a permissions issue
Mark – Founder, Phenomlab Ltd
Executive IT & Security Leadership
Phenomlab Ltd -
@cagatay If the upgrade appears to have worked, then you don’t need to run it again, but I would certainly take a look at the
nodebb-plugin-emojiissue in more detail as this is 100% a permissions issue@phenomlab faced same problem for upgrade to 2.8.5

Mark do you have this plugin on Sudonix? And which version are you running?
-
@phenomlab faced same problem for upgrade to 2.8.5
Mark do you have this plugin on Sudonix? And which version are you running?
@cagatay Yes, I do, but it’s not a version issue - it’s permissions.
Mark – Founder, Phenomlab Ltd
Executive IT & Security Leadership
Phenomlab Ltd -
@phenomlab permission for user right? so i did not change any permison for nodebb user so why it caused or what i should do for to give permision to nodebb user? till 2.8.2 nodebb user can upgrade any permission case what happened with 2.8.4
-
@phenomlab permission for user right? so i did not change any permison for nodebb user so why it caused or what i should do for to give permision to nodebb user? till 2.8.2 nodebb user can upgrade any permission case what happened with 2.8.4
@cagatay are you able to remove that plugin and reinstall or does it present the same error?
Mark – Founder, Phenomlab Ltd
Executive IT & Security Leadership
Phenomlab Ltd -
@cagatay are you able to remove that plugin and reinstall or does it present the same error?
@phenomlab yeap i removed the plugin and reinstall it problem is fixed.
-
 undefined phenomlab has marked this topic as solved on
-
@cagatay are you able to remove that plugin and reinstall or does it present the same error?
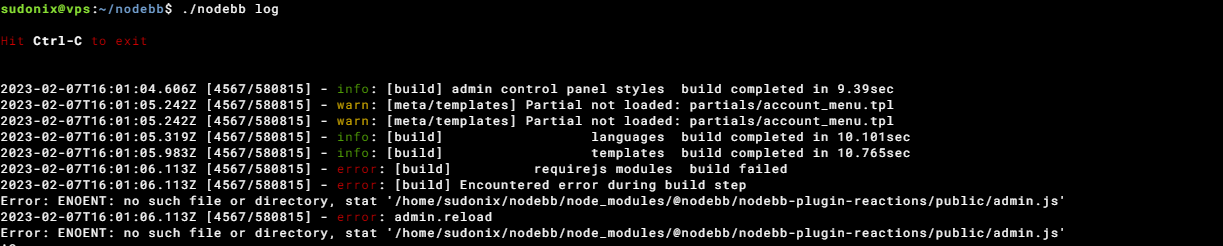
@phenomlab i deleted emoji plugin but while upgraded to 2.8.6 faced same problem.
cant understand whats going on. -
@phenomlab i deleted emoji plugin but while upgraded to 2.8.6 faced same problem.
cant understand whats going on.@cagatay can you provide the logs?
Mark – Founder, Phenomlab Ltd
Executive IT & Security Leadership
Phenomlab Ltd -
-
@cagatay does it work if you remove this plugin, perform the upgrade, and then put it back afterwards?
Mark – Founder, Phenomlab Ltd
Executive IT & Security Leadership
Phenomlab Ltd -
@cagatay does it work if you remove this plugin, perform the upgrade, and then put it back afterwards?
@phenomlab i removed the plugin then upgraded but faced same eror…
-
@phenomlab i removed the plugin then upgraded but faced same eror…
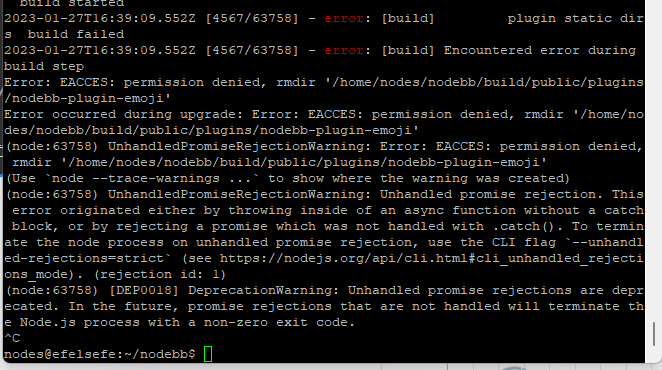
Maybe reset permissions on all nodebb directory like this ?
chown -R yournodebbuser:yournodebbuser /home/youruser/yournodebbdirectorychown -R nodes:nodes /home/nodes/nodebbbecause I see permissions error on
/home/nodes/nodebb/builds/....in the last screenshotAnd .upgrade and or rebuild nodebb
??
PW and WS Spirit alive
-
Maybe reset permissions on all nodebb directory like this ?
chown -R yournodebbuser:yournodebbuser /home/youruser/yournodebbdirectorychown -R nodes:nodes /home/nodes/nodebbbecause I see permissions error on
/home/nodes/nodebb/builds/....in the last screenshotAnd .upgrade and or rebuild nodebb
??
@DownPW yes, but we really need to understand why and how these permissions are changing.
Mark – Founder, Phenomlab Ltd
Executive IT & Security Leadership
Phenomlab Ltd -
@DownPW yes, but we really need to understand why and how these permissions are changing.
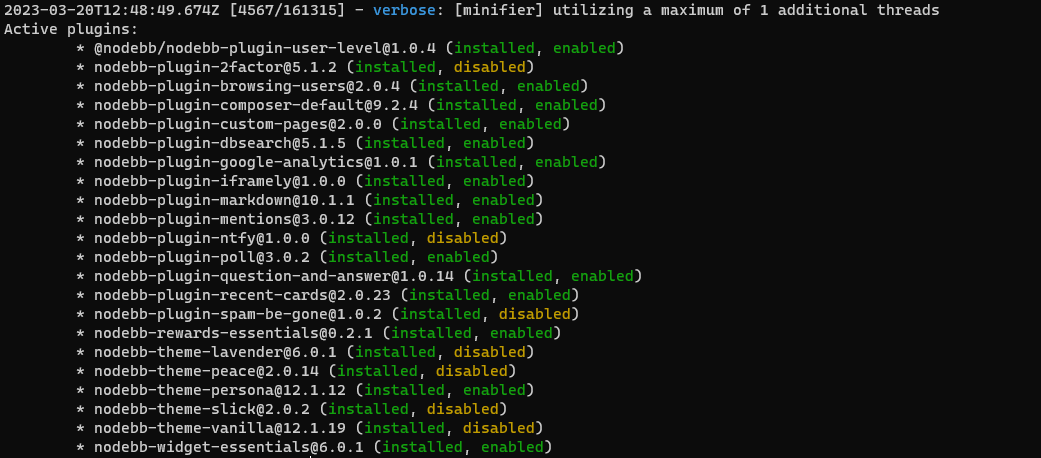
@DownPW @cagatay I found the reason why. This plugin is in fact faulty. I installed it myself because I wanted to add that feature to Sudonix. Not only does it push socket.io through the roof (and adds at least 2 seconds lag to each transaction)
It also is impossible to remove by using the GUI - see my experience below, which is exactly the same as @cagatay
Not great. The only way to remove this cleanly is from the CLI
npm remove @nodebb/nodebb-plugin-reactions
./nodebb build
./nodebb restart
I remember flagging this a while back - it’s here
https://github.com/NodeBB/NodeBB/issues/10582
And here (one I raised)
https://github.com/NodeBB-Community/nodebb-plugin-reactions/issues/8
So, my advice is NOT to use this plugin currently as the unnecessary load it places on your forum isn’t worth the functionality it provides.
Mark – Founder, Phenomlab Ltd
Executive IT & Security Leadership
Phenomlab Ltd -
@DownPW @cagatay I found the reason why. This plugin is in fact faulty. I installed it myself because I wanted to add that feature to Sudonix. Not only does it push socket.io through the roof (and adds at least 2 seconds lag to each transaction)
It also is impossible to remove by using the GUI - see my experience below, which is exactly the same as @cagatay
Not great. The only way to remove this cleanly is from the CLI
npm remove @nodebb/nodebb-plugin-reactions
./nodebb build
./nodebb restart
I remember flagging this a while back - it’s here
https://github.com/NodeBB/NodeBB/issues/10582
And here (one I raised)
https://github.com/NodeBB-Community/nodebb-plugin-reactions/issues/8
So, my advice is NOT to use this plugin currently as the unnecessary load it places on your forum isn’t worth the functionality it provides.
@phenomlab i dont have this plugin Mark. So the problem is currently continue.
-
@phenomlab i dont have this plugin Mark. So the problem is currently continue.
@cagatay Sorry - my mistake.
Mark – Founder, Phenomlab Ltd
Executive IT & Security Leadership
Phenomlab Ltd
Hello! It looks like you're interested in this conversation, but you don't have an account yet.
Getting fed up of having to scroll through the same posts each visit? When you register for an account, you'll always come back to exactly where you were before, and choose to be notified of new replies (either via email, or push notification). You'll also be able to save bookmarks and upvote posts to show your appreciation to other community members.
With your input, this post could be even better 💗
Register LoginDid this solution help you?
Related Topics
-
MogoDB v6 to v7 upgrade
Solved Configure -
-
-
-
-
-
-
NodeBB metadata
Solved Configure